When you published a blog post to promote your business years ago, you generated traffic quickly. There wasn’t much competition. You could rank for keywords with minimal effort, and you got social media shares and traffic easily too.
But right now, it’s a lot harder to generate traffic from the average blog post, as people publish 70 million blog posts every month (about 2.3 million a day) on WordPress alone.
This number is much higher when you take other platforms like Squarespace, Tumblr, and Wix into consideration.
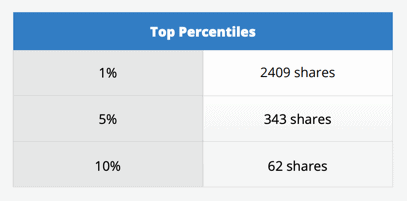
The median blog post gets just four shares and attracts only one backlink. Posts in the top 10 percentile get 62 shares, those in the top 5 percentile get 343 shares, and those in the top 1 percentile get 2409 shares.
If you write an average blog post, you won’t generate many shares and traffic. To get the most traffic, you need to write an exceptional post.
I have mastered the technique of writing blog posts after writing over 1000 posts. They have appeared on sites like Social Media Examiner, Forbes, and Entrepreneur. Some are under my name, and I was a ghostwriter of many more pieces.
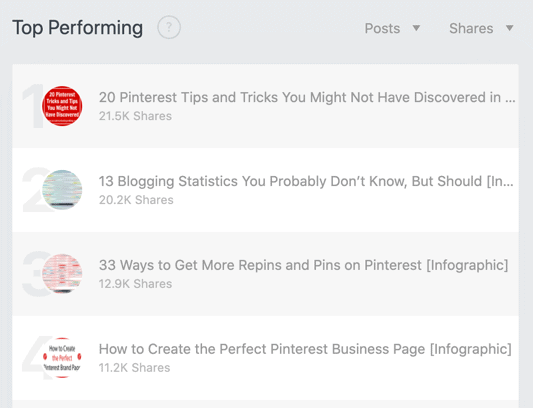
My posts get shared thousands of times. Here are a few from this blog with over 10,000 shares, as found by the share plugin Social Snap.
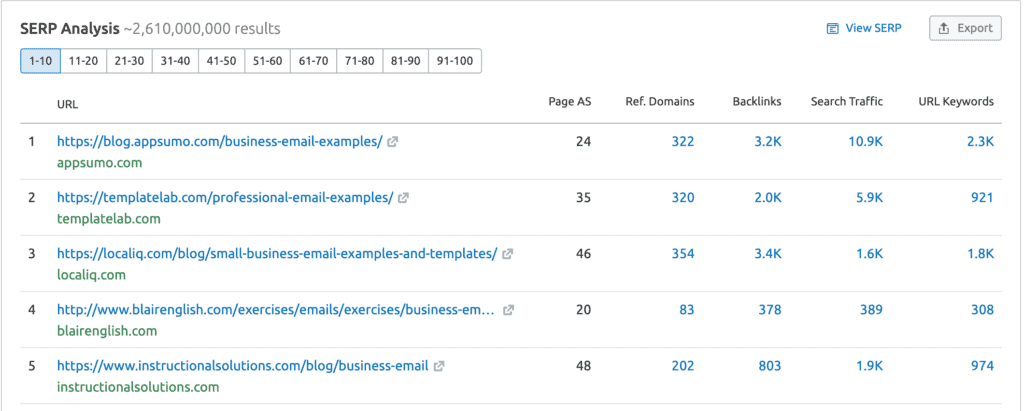
My posts perform well on search engines too. I wrote this one on Business Email Examples for my client Sumo. It ranks number #1 organically for the keyword “business email example” (with a search volume of 10,500 per month), even though some of the other posts have more backlinks.
It ranks in the top spots for several other keywords.
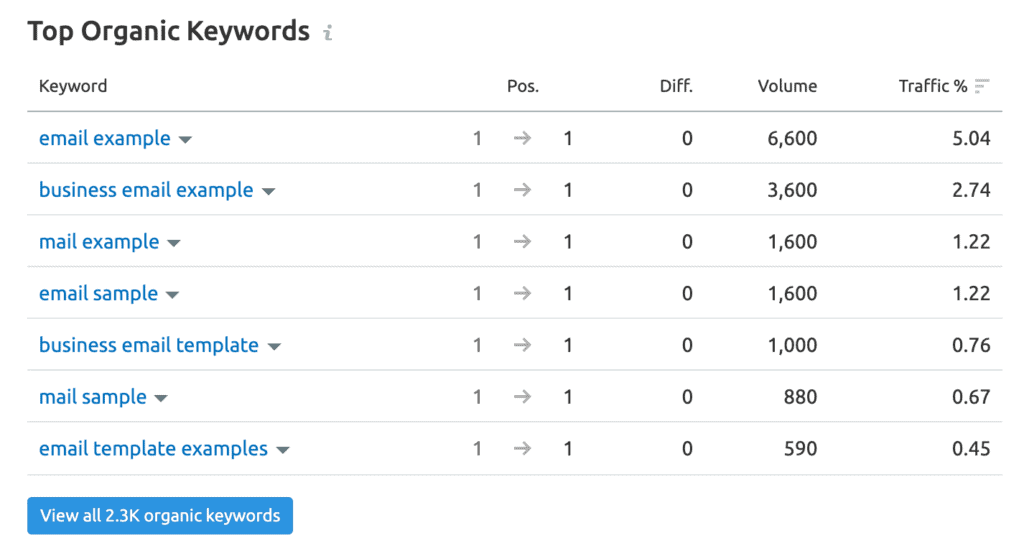
If my client tried to rank for these keywords via paid search, it would cost them $38,300 per month in the US alone. It’s far higher when you take all countries together.

Would you like to write posts like these?
Then you have to check out this step-by-step guide on how to write a blog post that gets shared hundreds of times, ranks high on search engines, and generates leads and sales.
There’s also an infographic at the end.
Bonus: I created a free blog post template to help you quickly whip up posts and even included templates for post cover images. Download it now.

- How to choose a good blog post topic:
- How to write a blog post headline:
- How to write a blog post URL:
- How to write the blog post metadata:
- Creating the blog post cover images:
- How to write the blog post introduction
- Writing the main content:
- Write the conclusion:
- End with a call to action:
- 12 more top tips for writing a blog post
- Now use the step-by-step guide to write your blog post
- How to write a blog post infographic
How to choose a good blog post topic:
Your blog post should solve your customers’ biggest challenges. Put yourself in your audience’s shoes and think about their biggest problems, then write them in a list. The solutions to these problems should be your blog post ideas.
Filter your ideas based on what you sell, as your blog topics should be relevant to what you offer if you want to convert readers to leads and sales.
Do audience research
If you want accurate targeting, ask your audience about their challenges. I create a simple survey with a tool like Paperform and Surveysparrow share it to my list and social media followers. This gives me lots of topic ideas.
You can also post your questions directly to social networks; some great networks are Facebook groups (in your niche), LinkedIn, and Twitter.
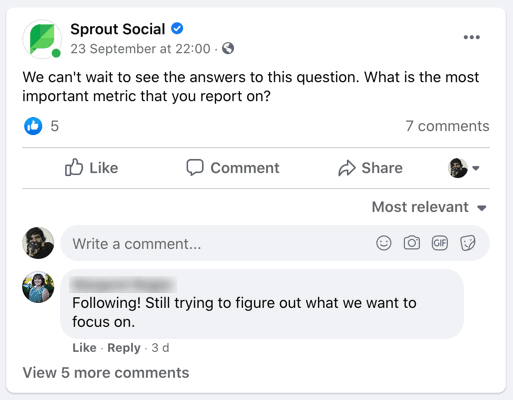
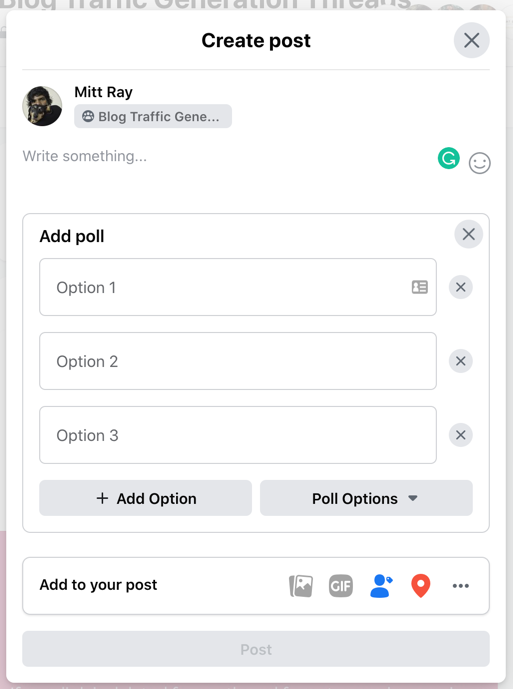
On platforms like Facebook, LinkedIn, and Instagram (stories), you can also post polls and get quick answers.
Once you have a list of challenges your audience faces and know the solutions you need to share, do the keyword research. This shows you the keywords relevant to the problems and solutions.
Find keywords for your blog posts
For this, I like to use SEMrush. It’s an SEO and CPC research tool.
To find high-volume organic keywords, start a free trial and enter a topic. Say I run a blog for a company that sells groceries or a food blog, and I want my blog to attract readers who own a dutch oven. I look up the phrase “dutch oven recipes.”
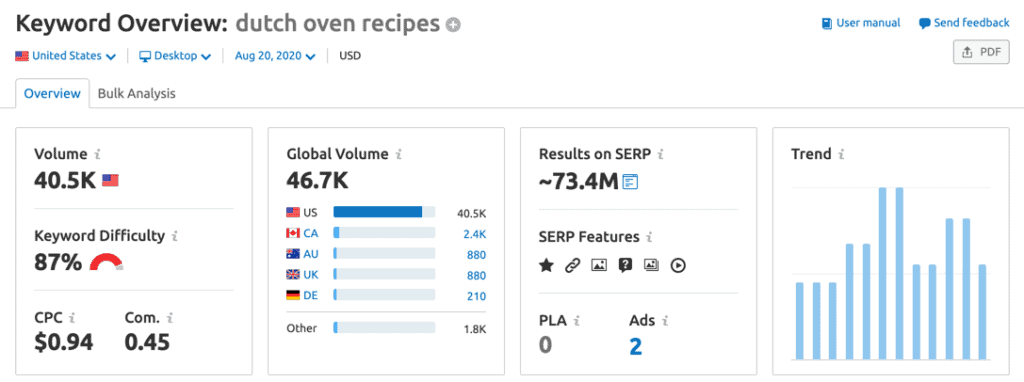
It shows me the number of times this keyword was searched (40,500 in the US; 46,700 globally). To get more accurate global search data, I can look for terms other regions use, such as “casserole dishes.” (Thank you, Wikipedia.)
SEMrush shows the cost per click for the keyword. The fact that competitors will pay close to a dollar for a click is a good sign. The higher the CPC rate, the more valuable the keyword is, as they will only pay if they make a profit over this spend.
It shows the keyword difficulty level too, and 87% is high. I look at the keyword suggestions shown in Keyword Variations, Questions, and Related Keywords.
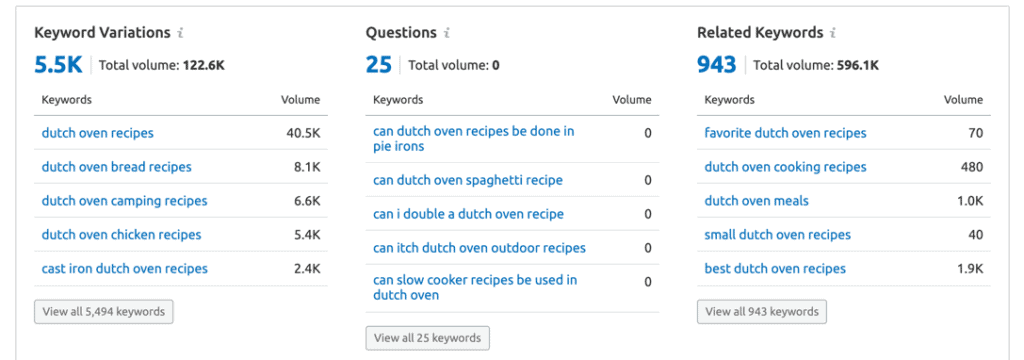
One of them is “dutch oven camping recipes.” If I click it, I can see its search metrics.
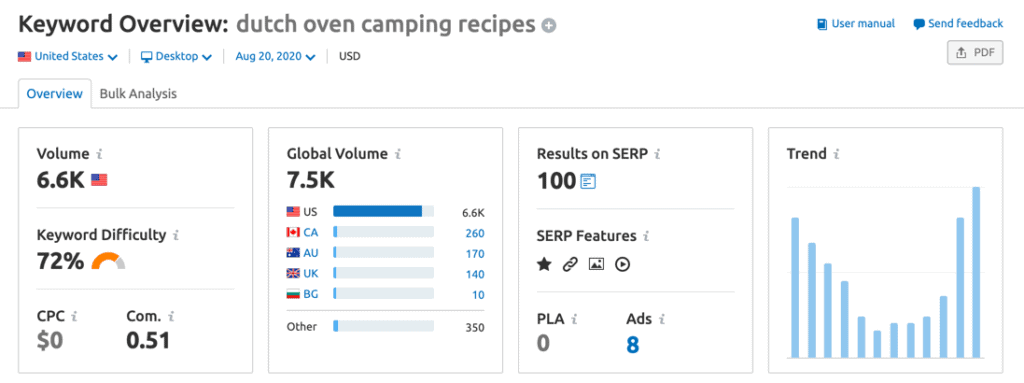
This has a lower search volume of 7,500, but the keyword difficulty is also lower, so it won’t be tough to rank for it.
Use this technique with a keyword research tool to find keywords with good search volume and low difficulty.
If you are unsure what difficulty level you should aim for, I recommend you instead use Moz’s Domain Authority metric, which helps assess the SEO authority of a website from its backlink profile.
You can use it for free. All you need to do is sign up for a free Moz account.
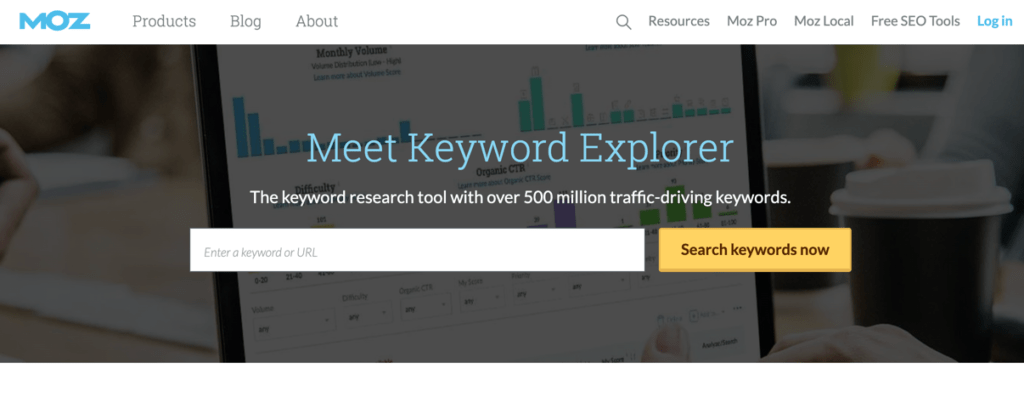
Then install the MozBar Chrome extension. And turn it on.
After that, it will show you the Domain Authority of every site you visit, including yours.

This will help you assess your ranking potential for keywords.
Say you want to write a post on “how to size a mountain bike” and wonder if you can rank for it, simply search for it on Google. On the search engine results page (SERP), you will see each site’s DA right under the result.
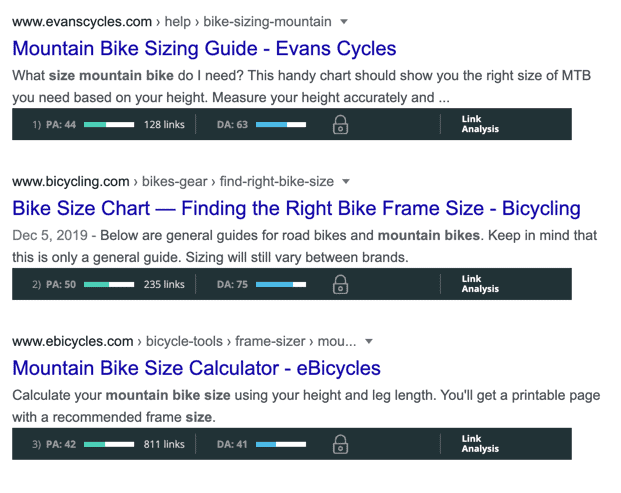
For this keyword, I found that most sites ranking have a DA between 40 and 75. So, I would only work on a post if my DA is 40 or above. Otherwise, I would continue researching until I found keywords that work for lower-authority sites.
With this method, look for keywords with good volume using a tool like SEMrush, then search those keywords on Google and assess their DA in the results.
But wait! Search volume, difficulty, number of backlinks, and authority aren’t the only metrics to look for while researching keywords. There’s another key metric to consider — clickthrough rate.
Check the clickthrough rate:
Look at the stats for the keyword “How Big is a Blue Whale.” It gets searched 27,600 times every month. Isn’t that amazing?
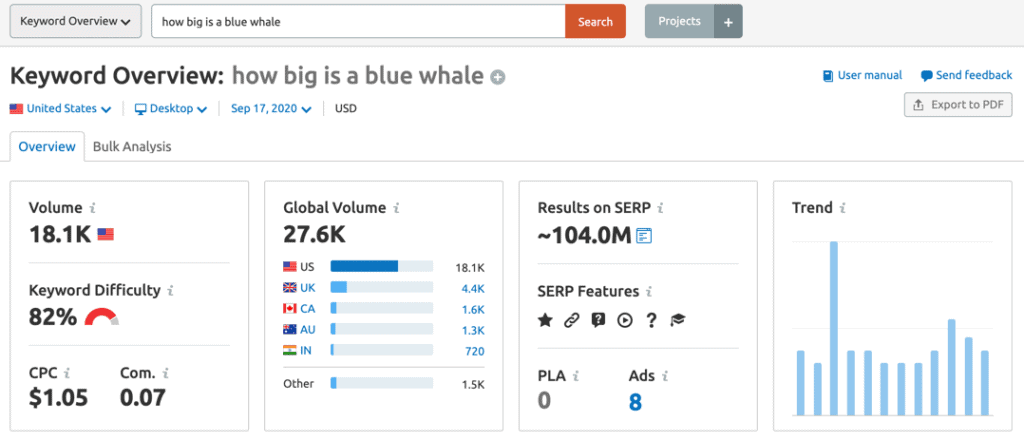
Ranking for this keyword can get you a lot of traffic — or will it?

The phrase has a click potential of just 20, according to SEMrush. For every 100 searches, only about 20 people will click a result.
If you search the keyword on Google, you’ll see people can find the answer without clicking a result.
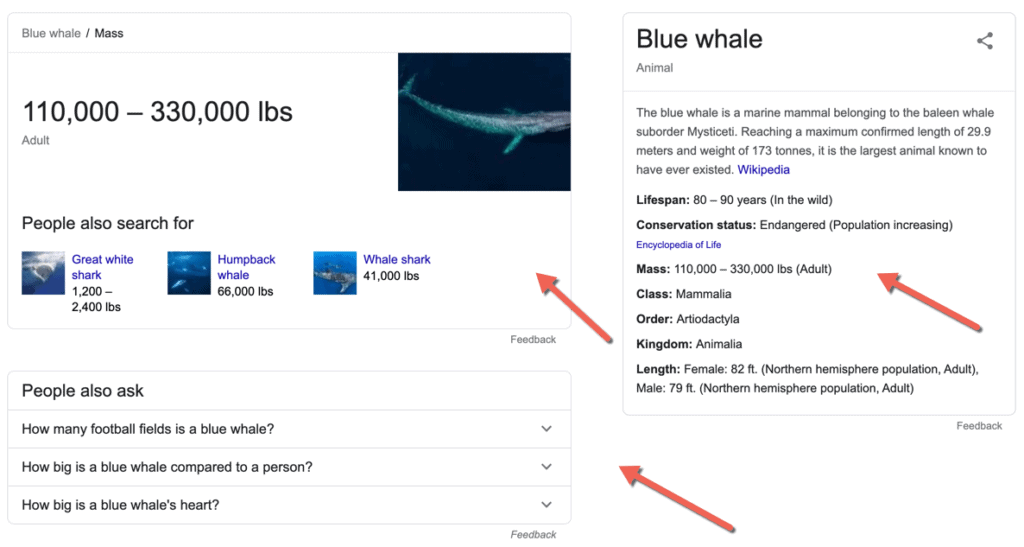
People can see how much they weigh and how long they get. They can also use the “People Also Ask” suggestions to find even more relevant results.
The “People Also Ask” feature can deter people from clicking a result, but you can use it to find alternate keywords.
There are 27,600 searches for this keyword, but likely only 4,520 clicks, and the difficulty is 82%. It’ll take a lot of work to write a good blog post and build links. If you really want to rank for it, you need to consider the time this will take and the conversions and revenue you will generate in return.
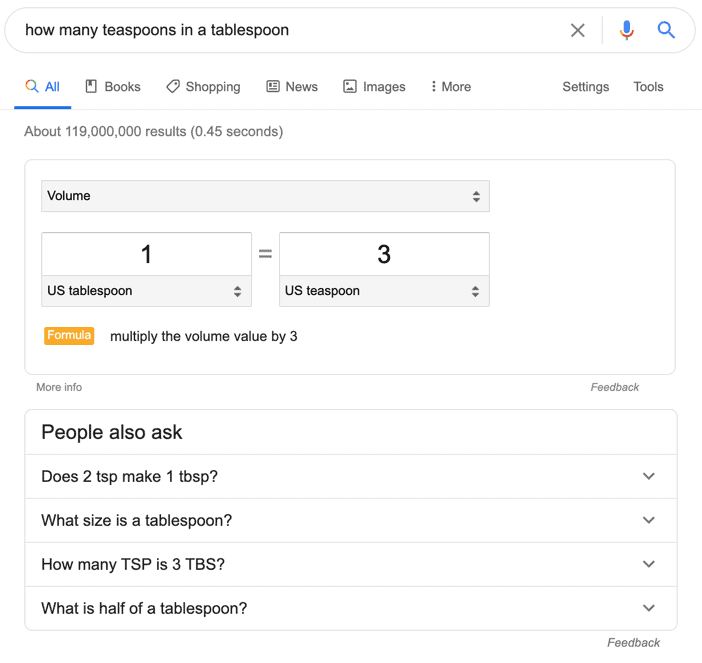
Another good example is “how many teaspoons in a tablespoon,” with a massive search volume of 345,600.

But again, only 20% of people click a result, as they can see the answer right on Google.
An example of a keyword with a high clickthrough rate is “Instagram story ideas.” The search volume is 37,700.
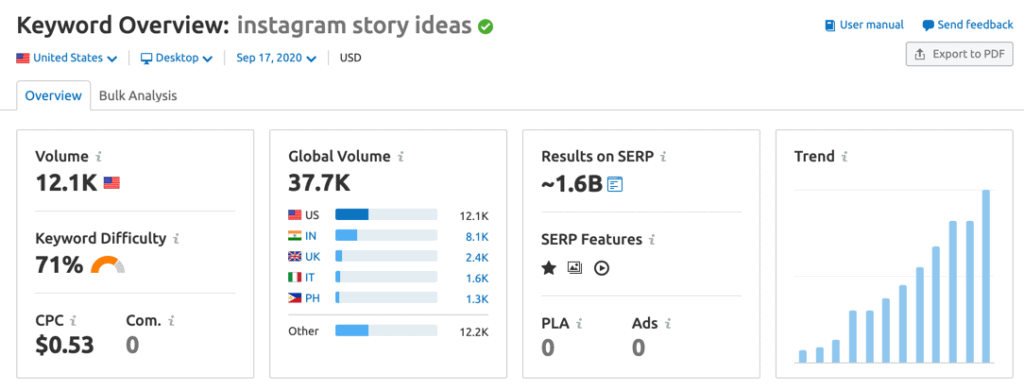
And the click potential is 100. This means that 100% of people click the result.

Why is the click potential 100? Google doesn’t give a direct answer in the results but teases the searcher with a result that leads to a blog post.
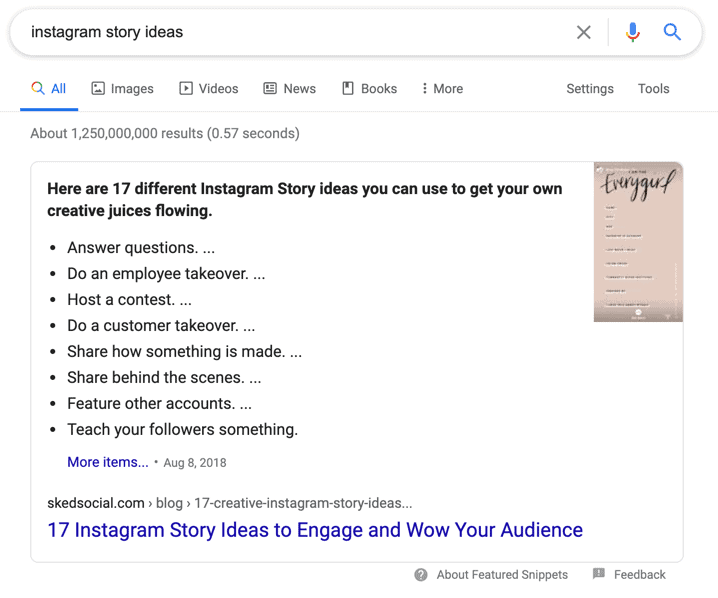
Trying to rank for this keyword would be a positive move, as it has good search volume, a decent difficulty rate at 71%, and a high clickthrough rate.
Do social media research to find popular posts
Search engine traffic can help, but it’s risky to put all your eggs in one basket. So, use a tool like Social Animal to see which blog posts and topics get the most shares. Take a keyword with a good search volume from the previous step, and enter it in Social Animal.
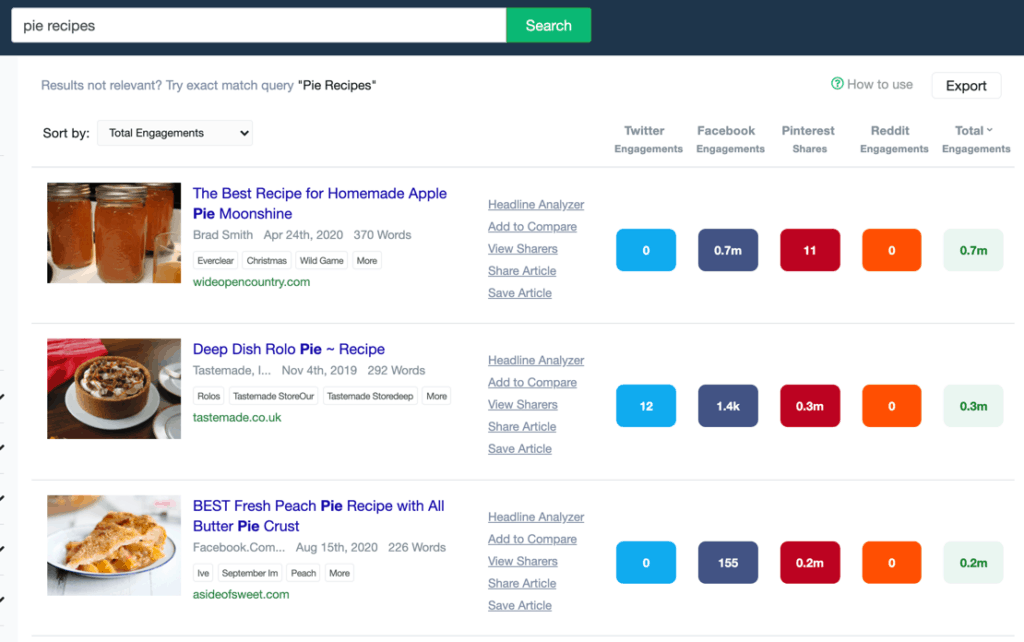
The tool shows the posts that get shared the most and the networks with the best performance for each post. You can even filter posts based on specific social networks, but I recommend looking for topics that will do well on multiple networks.
The networks you choose to focus on should depend on your audience. If you’re selling women’s shoes, Pinterest or Instagram will be essential; if you’re selling resume writing services, LinkedIn may be what you care about most.
If you rely on a single social network, an algorithm change of that network can make your entire content marketing strategy collapse. This happened to Little Things.
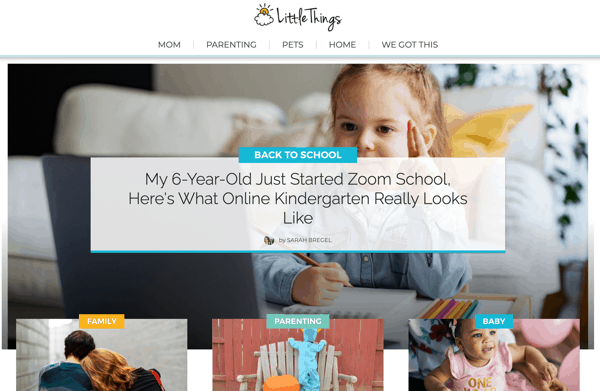
They received about 50 million visits a month. Their strategy focused on creating clickbait content that does well on Facebook. Then Facebook changed their algorithm.
As a result, they lost 75% of their influencer and organic traffic.
To drive long-term traffic, pick topics that thrive on popular networks such as Facebook, LinkedIn, Twitter, Pinterest, and Reddit, and on niche networks such as Yummly and Growth Hackers. You can find niche networks during topic research; the top-performing posts on popular networks will probably do well on these networks too.
Then match them up with your keyword research. This will ensure that your blog post will perform well on multiple social media platforms and on search engines.
An example is the keyword “easy drawings for beginners”. My SEO research tool shows it has a search volume of 42,400 globally.
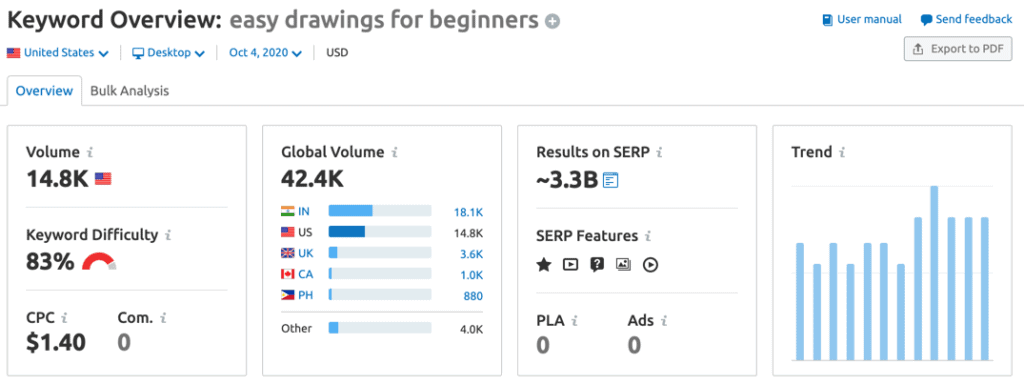
After I researched the keyword on Social Animal, I found that list posts that compile tutorials, ideas, and tips and tricks get the most shares.
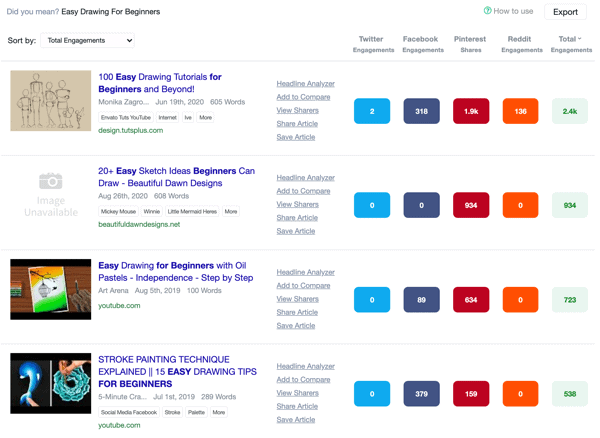
The best option is to create a tutorials list post as it got the highest shares. You can make a list of the best tutorials on your blog or include those from others or do both.
It’ll be hard to rank for this keyword. But it has a high search volume. Ranking for it can be a long term strategy as you can aim for social traffic in the short term.
When to pick topics that aren’t popular
You don’t have to always come up with topic ideas with high search volumes and shares.
Sometimes, it is better to write posts on very specific topics and target a small audience looking for advanced topics.
A narrower focus could bring in better leads, give you less churn and chargebacks, and ease support or sales call volume. You won’t make users get halfway down the funnel before they discover the product or service costs 10 times what they want to pay.
An example is my post on How to Get a Million Pinterest Followers.
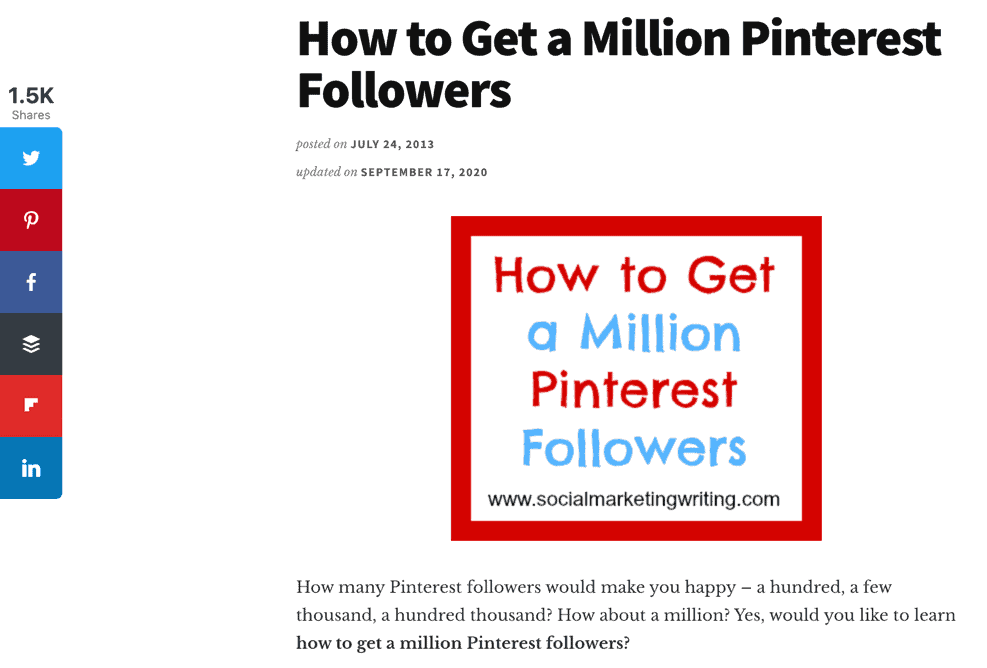
If you check the search volume for “million Pinterest followers,” you will find few searches for this keyword and no relevant keywords with search volume.
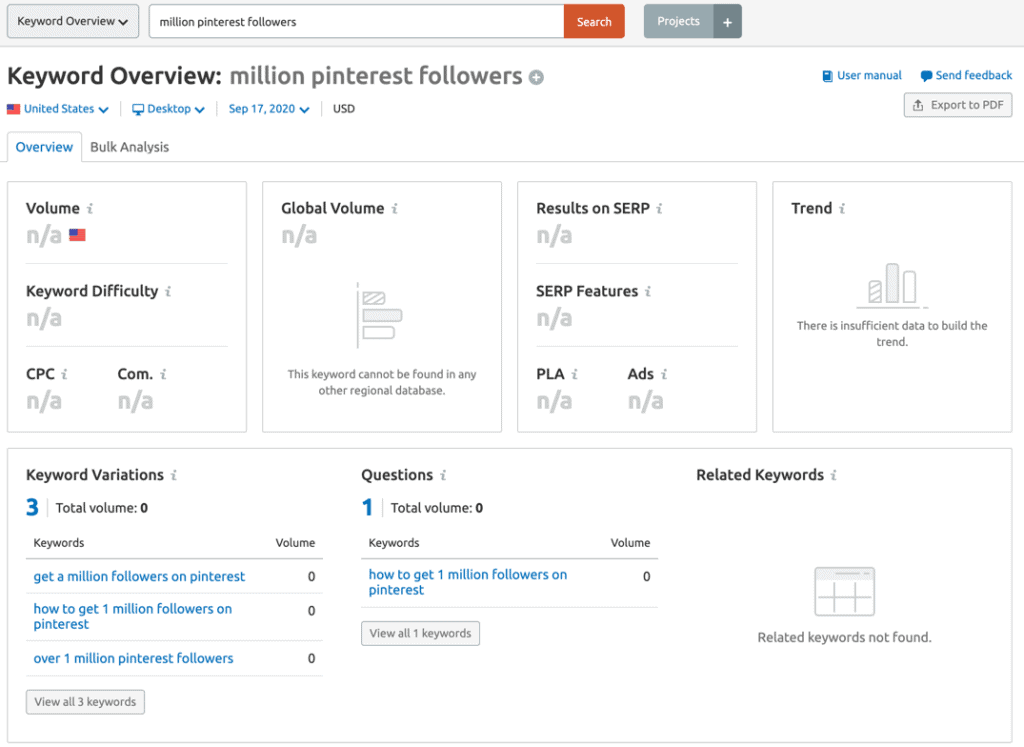
But my audience research data from surveys, Google Analytics, email, and Pinterest itself showed me that people are interested in this topic. I realized that people who want to get to a million Pinterest followers probably already have more than 100,000 followers.
The people reading this post will very likely be interested in my Pinterest management and marketing services. They are already doing well and might be generating revenue from the network.
So, I wrote an advanced article on how to get a million Pinterest followers. I wrote it for people who already knew the basics and wanted something new they hadn’t heard before.
You can promote an article like this through outreach and ads and reach the specific target audience. I did this and drove traffic to it and got over 1,500 shares.
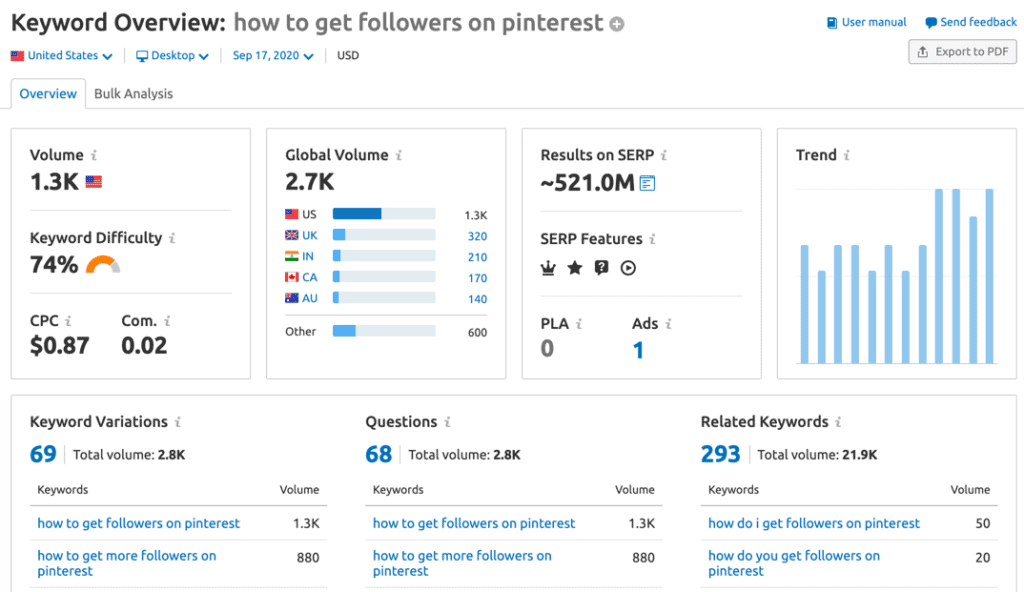
This article is the opposite of my post on 28 Ways to Get More Followers on Pinterest, as that topic is searched more and appeals to a larger audience. People with a negligible number of followers to several hundred will want to read it.
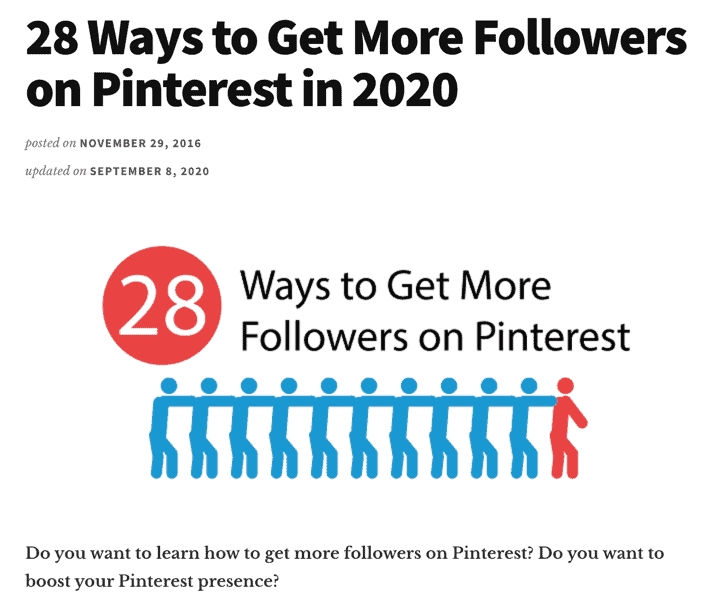
Notice that keywords such as “how to get followers on Pinterest” and “how to get more followers on Pinterest” have a good search volume.
I wrote this post to drive traffic and build my list. So, I created the “double your Pinterest followers” challenge as a content upgrade that complements the course. This helps me get a high conversion rate from the traffic I generate.
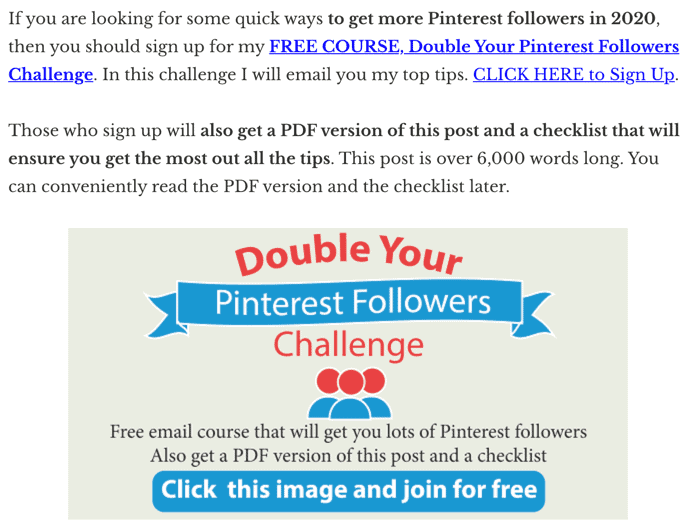
These posts work best to reach a mass audience to sell your products to or to promote affiliate products, as you will get a lot of visits, and you will have a pool of readers to convert. They can even work if you want to generate revenue from ads.
While targeted posts will work best when you sell high-ticket offers and want to reach a specific audience who can pay for your high-end services, they require more time and money to promote these posts.
To get the most from these posts, create a landing page that promotes services your readers will want to buy. You can promote the landing page when they sign up to your email list or by showing retargeting ads to everyone who visits the post.
Another excellent example of a blog post targeted to a specific audience is Which Fruit Trees Grow Best in Illinois and How to Care for Them.
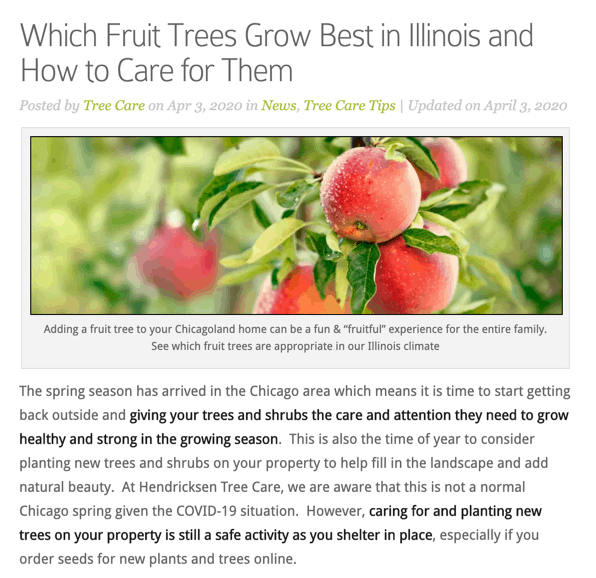
If you look up the keywords, you will find they have some search volume, but not a lot.
Most of this blog’s posts are about growing and taking care of trees in Illinois; their company is based in Illinois, and they target people in that region. The search volume might be low, but they can reach that audience through outreach and ads and generate business.
They can also go even more specific and write posts on topics such as “best trees for hotels in Illinois” and “best trees for universities in Illinois.” The more specific they are, the higher their conversions. The competition will also be low, as only a few people will write on these topics.
You need to know your audience to use this technique of writing narrowly focused topics — put in the research time to make sure you nail it.
Don’t forget to convert the visitors to leads.
The site uses sidebar contact form and their phone number in the header to help convert visitors. You can use content upgrades and retargeting ads to convert readers, too.
How to write a blog post headline:
Write your headline first, even though it will be a placeholder. After you write the post and see the direction it took, write the final headline.
Your headline needs to do four things:
- Attract attention
- Get people curious enough to read the rest of the article
- Rank well on search engines
- Make it easy for people to share
Here are seven tips to write headlines that will do the items listed above.
7 tips for writing better blog post headlines:
Use numbers:
According to a SEMrush study, list-based headlines with titles such as “X ways to” and “‘X things to” get the most shares and unique page views.
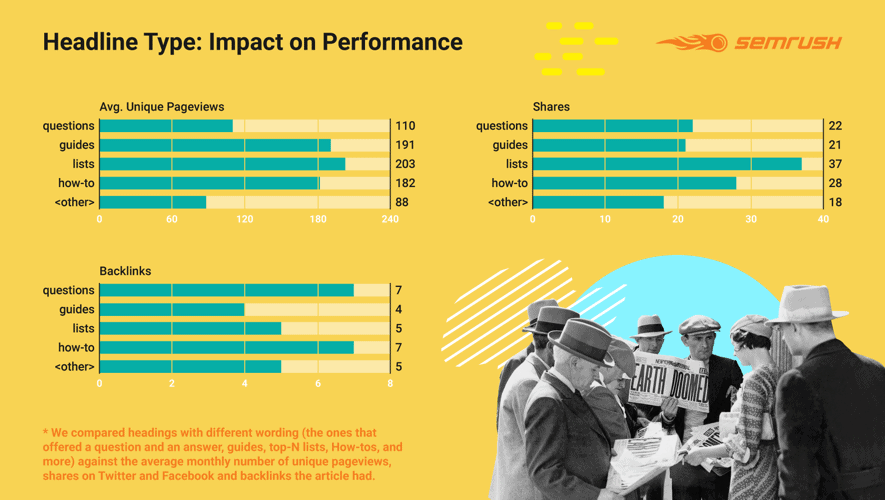
Therefore, if you can present your post in a list-based format, you should use a list-type headline.
They found that the ideal number of lists is five for every 500 words.
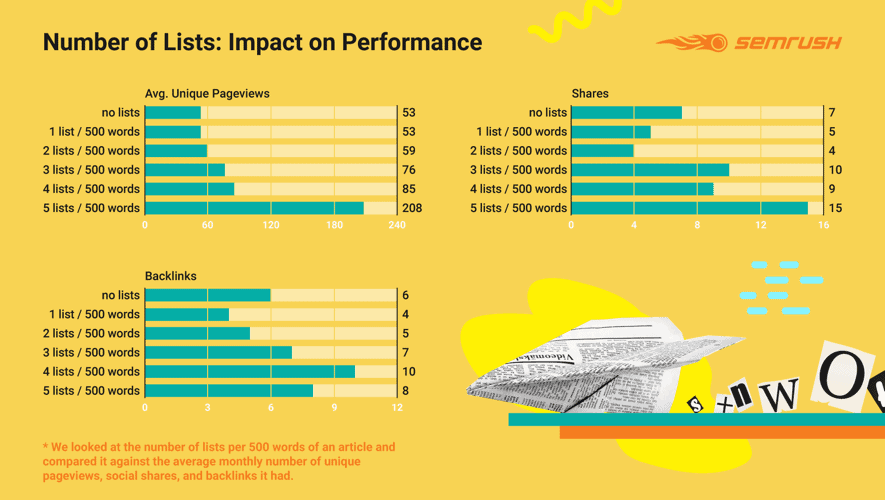
Articles with five lists for every 500 words attract the most page views and shares, while those with four lists attract the most backlinks.
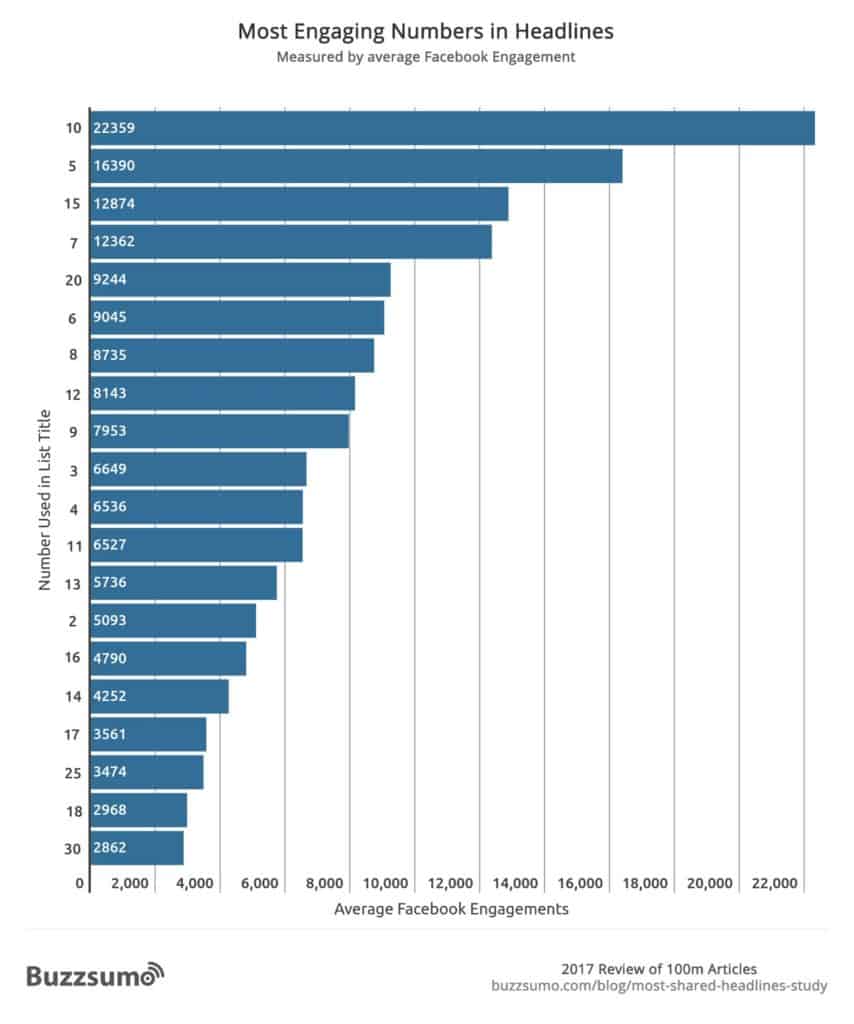
Another study found that list posts with 10 items in the headline get the most Facebook engagements at an average of 22,359. So, you might want to hit this number whenever you can. Other popular item numbers in lists are 5, 15, 7, and 20.
The SEMrush study mentioned earlier found that how-to headlines attract the second-highest number of shares and the second-highest number of backlinks; this might be a good angle that will work for you too.
Guides and questions are two other popular formats. Experiment with all these headline formats to see what works best for you and your audience.
Occasionally write negative headlines:
Try negative superlatives in your headlines occasionally, as posts with negative superlatives can have a 50% higher clickthrough rate than those without positive or negative superlatives.
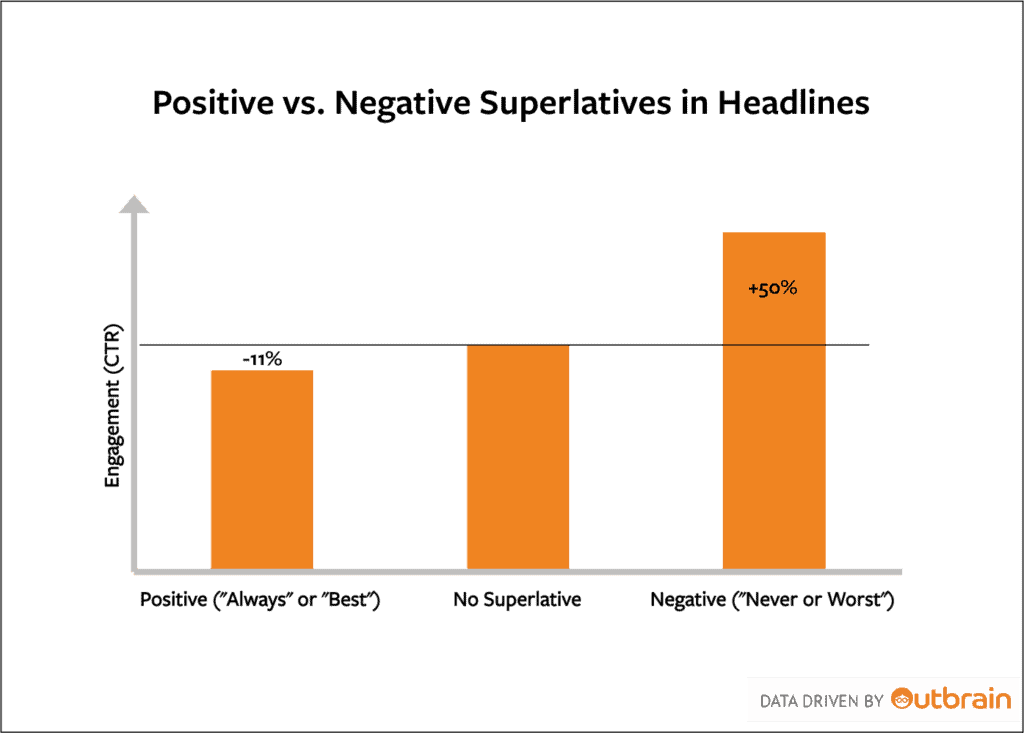
Source: Outbrain
Posts with positive superlatives get 11% fewer clicks than those with neither positive nor negative superlatives.
But don’t overdo this, as you don’t want to create a grim atmosphere on your blog.
A negative headline example is 6 Bad Instagram Caption Ideas and their Good Solutions.
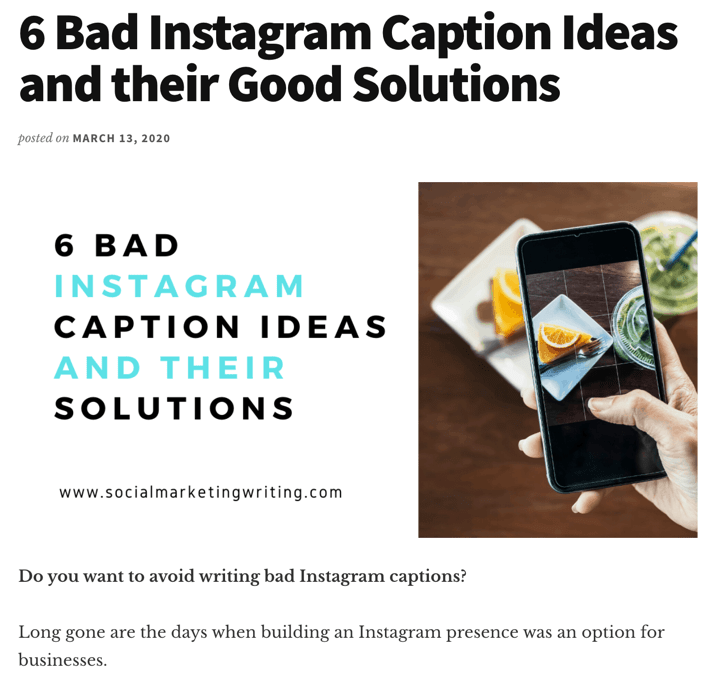
It has both negative and positive superlatives!
Write longer headlines with 14+ words:
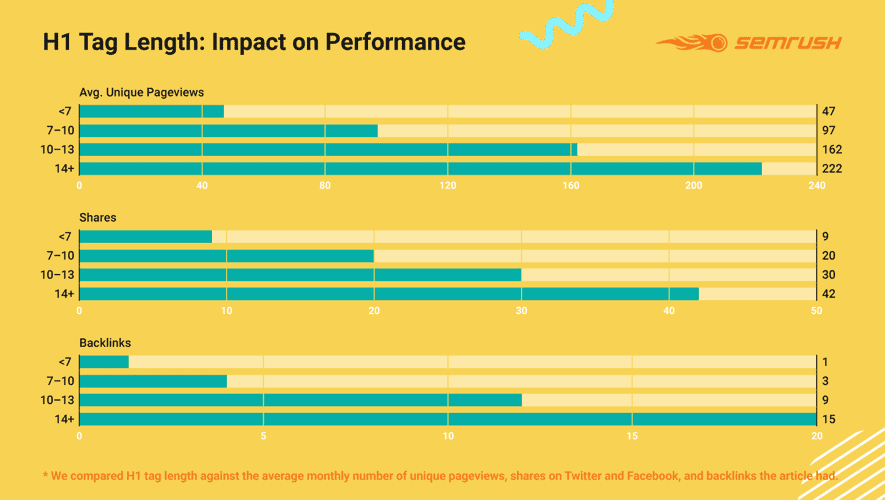
The same study from SEMrush found that blog posts with headlines (H1 tags) 14+ words long get twice as many shares and traffic and five times more backlinks than posts with headlines 7-10 words long.
Another study from Backlinko found that headlines 14 to 17 words long get 76.7% more social shares than short headlines.
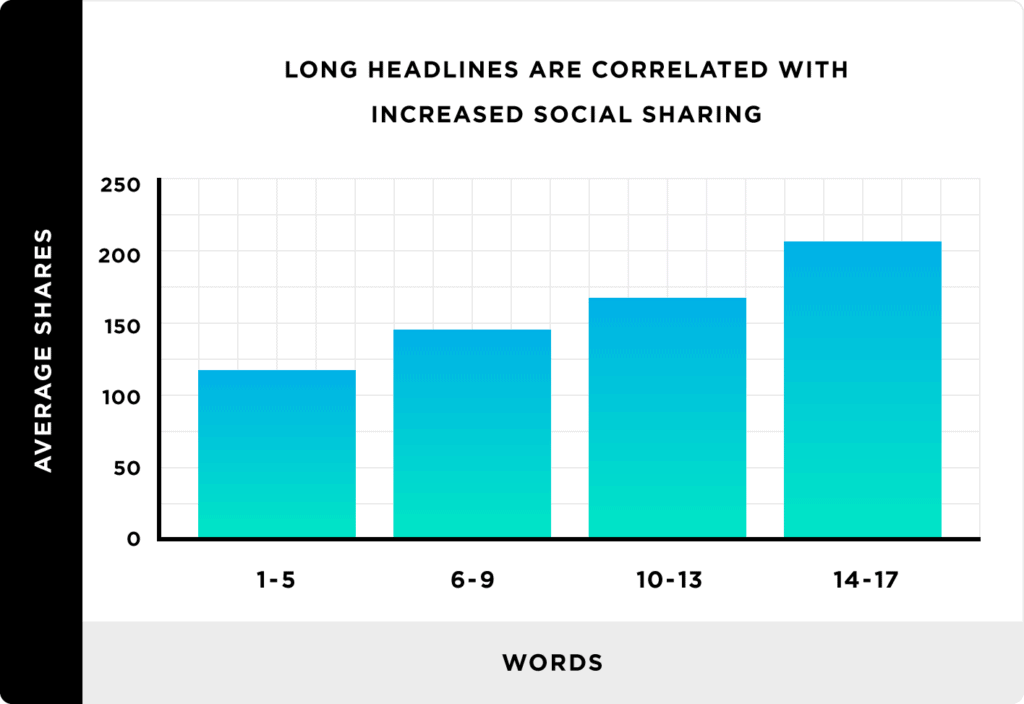
So, write a longer headline.
Use keywords:
Include the primary keyword you found through your research in the headline, as it can significantly improve your chance of ranking.
If the keyword you found was “sweet potato pie,” a couple of headlines that will work are:
- 10 Sweet Potato Pie Recipes You Should Check Out
- Hungry for Sweet Potato Pie? Here’s a Simple Recipe that Works Every Single Time
Here’s an example of a good headline with the keyword placed in it: The 25 Golden Rules of Long Distance Running.

The headline targets the keyword “long distance running.”
Use power words and phrases:
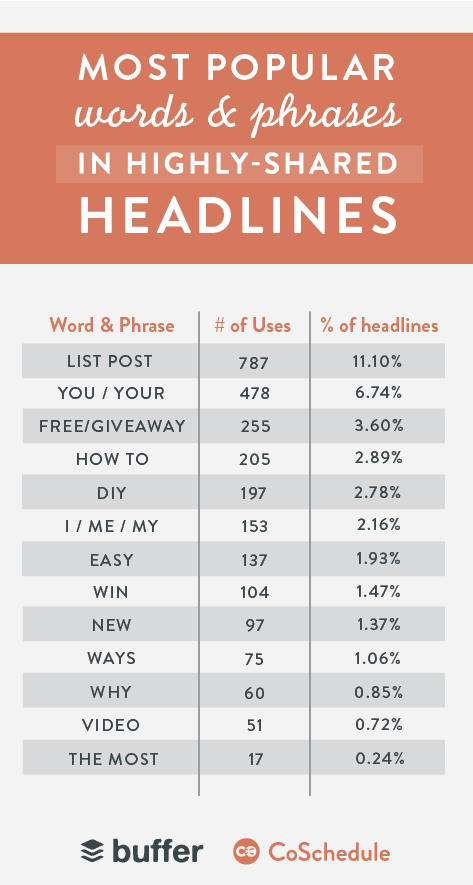
CoSchedule and Buffer conducted research and found the most common words and phrases in highly shared headlines.
Buzzsumo conducted another study where they analyzed power phrases that appear at the beginning and the end of the headline and how they influence shares.
Here are the popular phrases present at the beginning of the most-shared headlines.
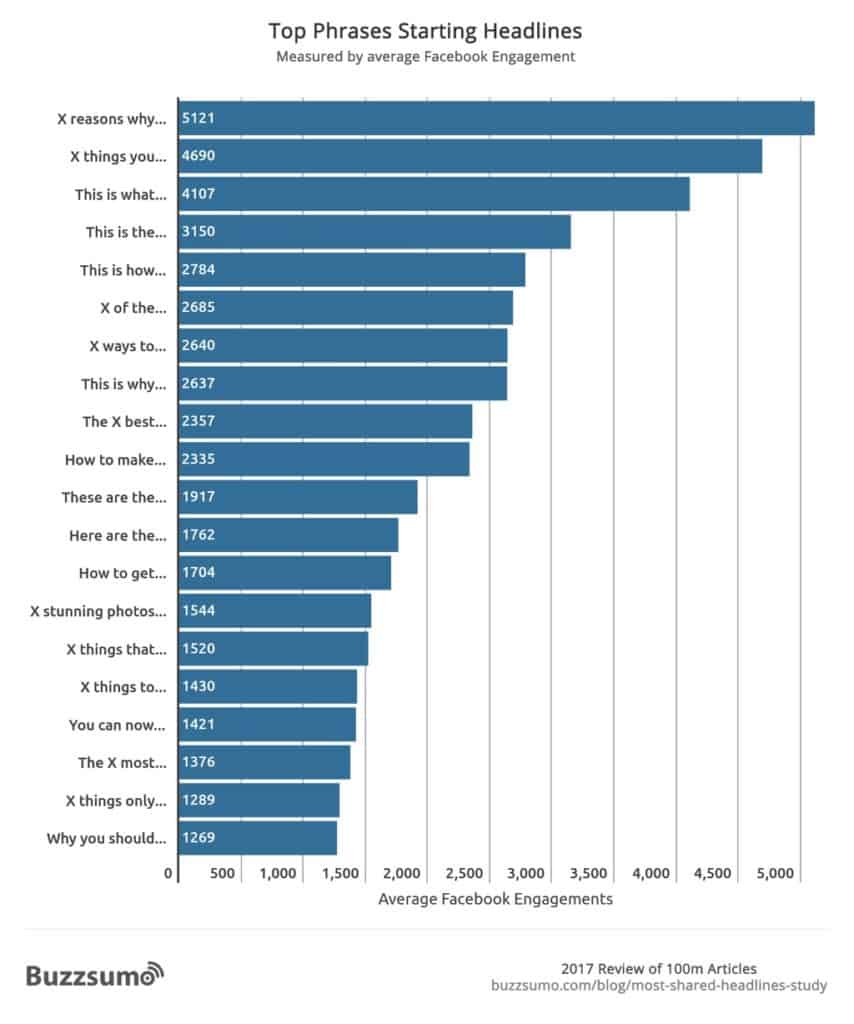
Many top-performing phrases seem to suit list-based headlines.
And here are the phrases that are present at the ending of headlines that get the most shares.
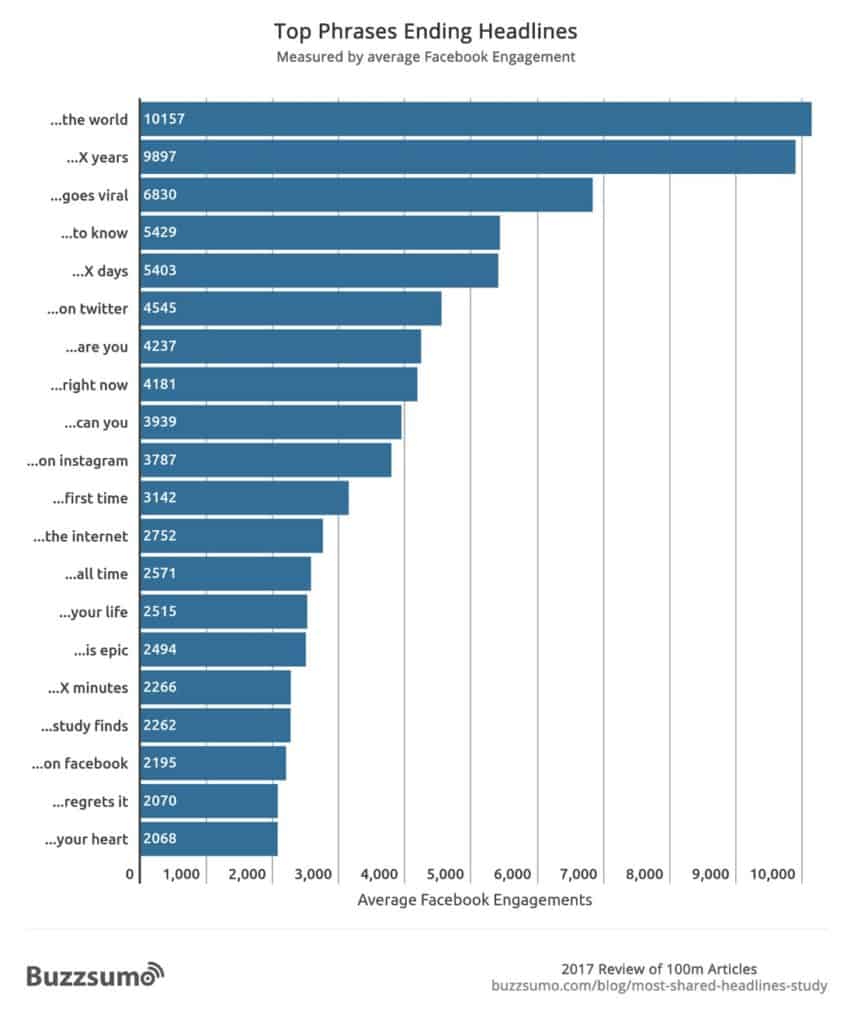
Try to include both types of phrases in your headlines. You might also want to check out this study on the top phrases in B2B headlines.
Stress the pain point:
To get people curious, include just enough of the pain point that they will want to read the rest of the article. If you reveal too much, fewer people will scroll down to read the rest.
Write 10 headlines:
While writing the headline, don’t just write that one perfect headline. Instead, write 10 versions using the tips I shared above, then pick the one you think will perform best.
You can write more headlines if you would like to. The writers at Upworthy, for example, write 25 headlines and then pick the best.
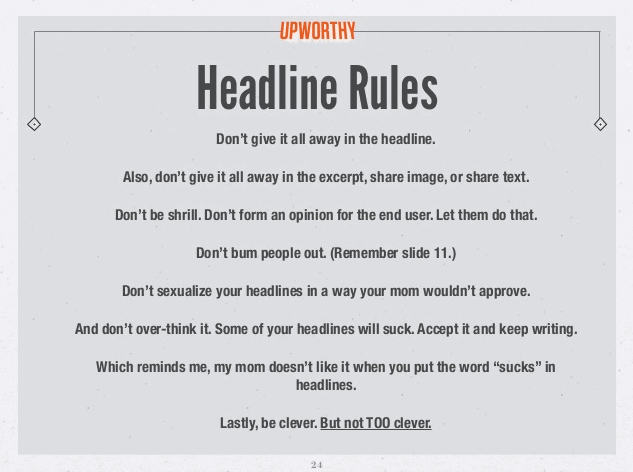
Source: Upworthy
If you are undecided about which headline to go with, you can split test different versions. A tool that can help you with this is Thrive Headline Optimizer.
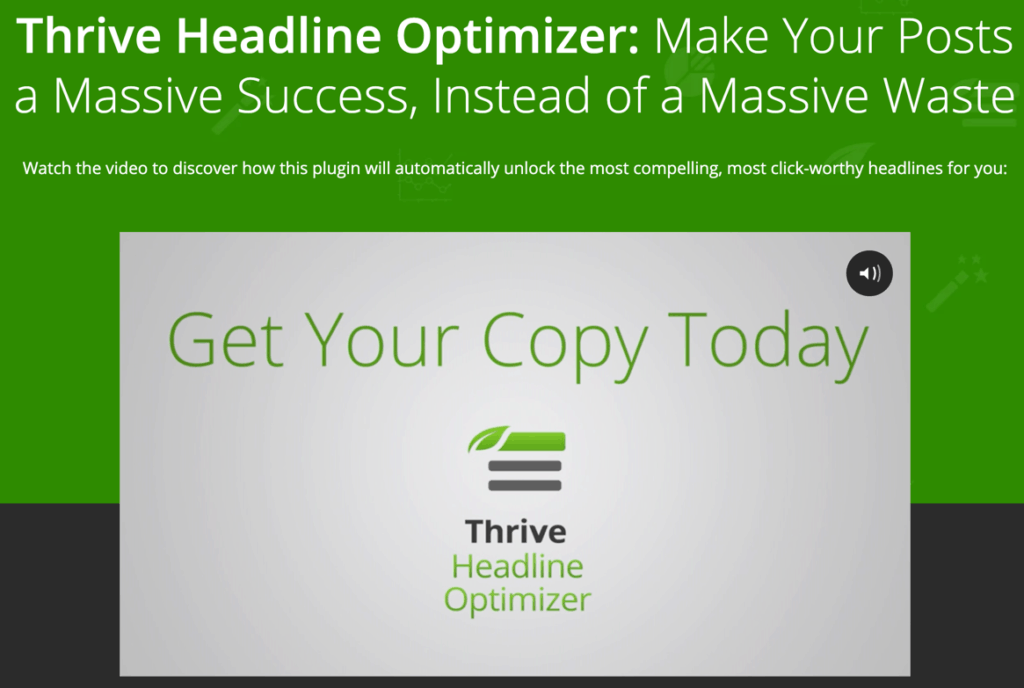
It will not only let you add different headlines to one post and split test them, but it will also monitor performance. You can then choose the one that performs best as the final one, days, or weeks after the post goes live.
The data can also help you write better headlines in the future.
8 headline formulas that work:
Here are some headline formulas to review. You can use them to quickly write headlines that rank on search engines and get shared — and help you generate more traffic.
Number headline formulas for list posts
Formula #1: [Number] Reasons Why [Keyword] [The Result]
Example: 10 Reasons Why Running Every Day is Good For Your Heart
Formula #2: [Number] [Power word] Ways to [Keyword] – [Stress One Point]
Example: 24 Unique Ways to Increase Productivity Today – #8 Will Surprise You the Most
How to Headline formula
Formula #3: How to [Result Your Audience Wants + Keyword] [A Time Frame]
Example: How to Double Your Instagram Followers in 90 Days or Less
Formula #4: How to [Result Your Audience Wants + Keyword] [By Avoiding A Difficulty they Usually Face]
Example: How to Eat Healthy When You Don’t Have Time to Cook Every Day
Negative headline formula
Formula #5: [Number] Mistakes You Are Making While [Keyword]
Example: 9 Mistakes You Are Making While Training Your Dog
Formula #6: [Number] Reasons Why Your [Keyword] is Failing
Example: 15 Reasons Why Your Social Media Marketing Strategy is Failing
Question headline formula
Formula #7: Are You [Pain Point + Keyword]? Here Are [Number] [Solution(s)] that Can Help
Example: Are You Unable to Do a Handstand? Here Are 11 Solutions That Can Help
Case Study Headline formula
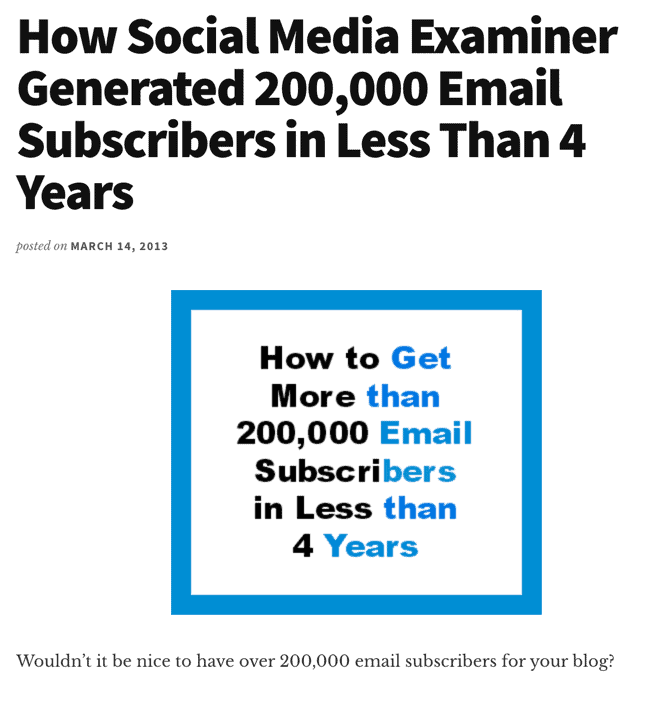
Formula #8: How [I/We/They/Company Name] Got [A Result + Keyword] [In A Timespan]
Example: How Social Media Examiner Generated 200,000 Email Subscribers in Less Than 4 Years
To find more headline ideas and to brainstorm formulas, you can use Social Animal. They have a tool called Headline Analyzer. If you search a keyword related to your post topic, it will show the best-performing posts.
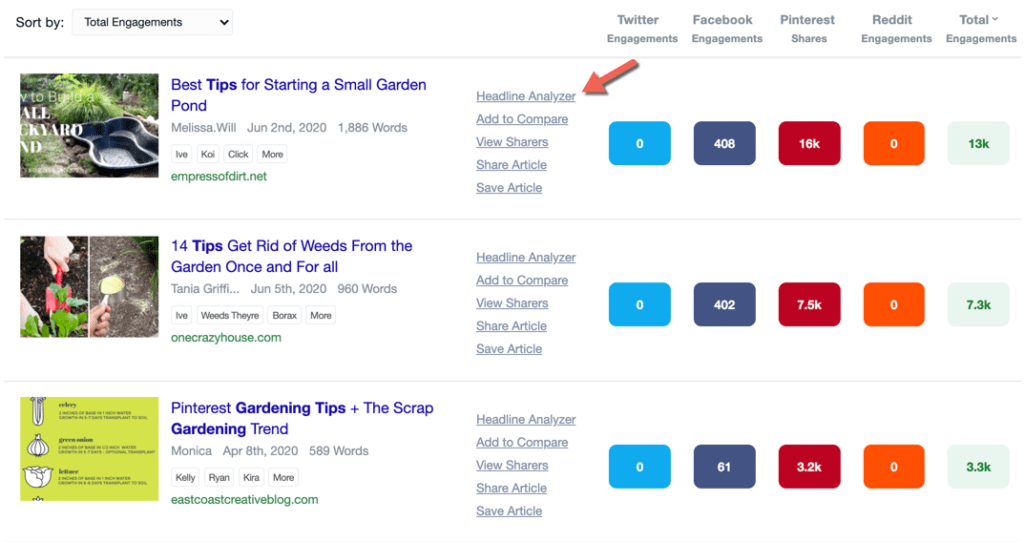
If you click Headline Analyzer, it will show you the headline’s strengths and weaknesses.
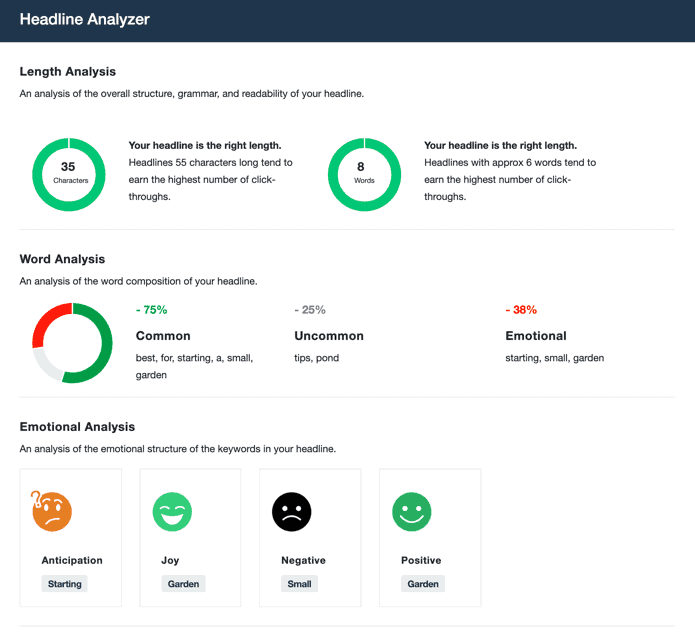
You can also search your competitors’ domains with this tool to analyze their headlines.
How to write a blog post URL:
One mistake people make while publishing blog posts is using the URL the blog automatically generated.
For example, if the post has the headline 10 Reasons Why Running Every Day is Good For You, the blogging platform automatically generates the URL.
yourdomain.com/10-reasons-why-running-everyday-is-good-for-you
People leave it just like this and publish the post. Instead, they should remove everything except the keywords.
As pages with short URLs tend to rank higher on search engines, as shown in the below graph.
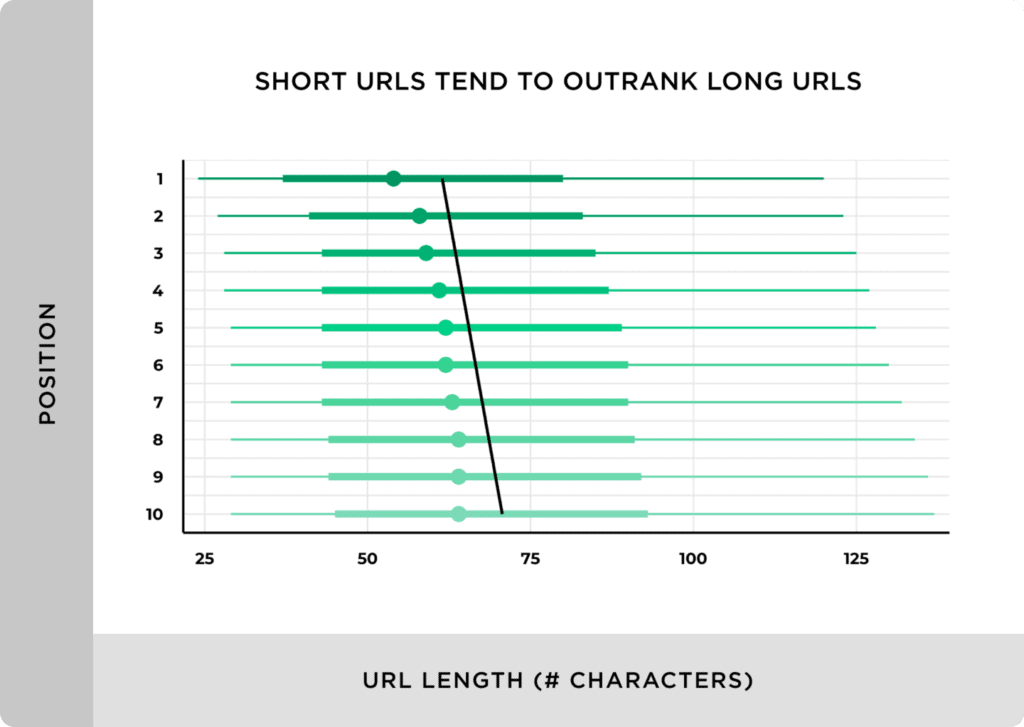
Using shorter URLs works because adding unnecessary information makes it hard for Google to crawl your site.
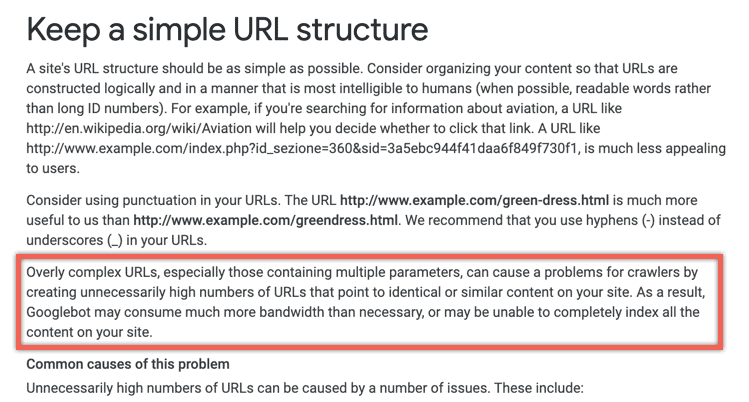
So instead of a URL like this yourdomain.com/10-reasons-why-running-every-day-is-good-for-you
You should use a simple one like below with just the keywords, but make sure to separate each word with a hyphen (-).
yourdomain.com/running-every-day
The keywords here are “running every day”.
Your blogging platform might add the date to the URL, and read like the one below:
yourdomain.com/2015/12/25/10-reasons-why-running-every-day-is-good-for-you
But here again, you need to remove the date, as it isn’t always relevant. You should just include the keywords and keep it as short as possible.
Another problem you will face if you include the date in your URLs is people will always know when you wrote the post, even if you update it.
People want to read the freshest content. If you write a post in 2018, but update it in 2020, people will see the date on the URL and get deterred. They won’t be sure that you changed it.
So, avoid using dates in your URLs.
Avoid including numbers in a list post’s URL. You can easily change the number of items in your list posts and then modify the headline. But you can’t change the URL easily. You will need to apply redirects, which can be a pain. And it can affect your SEO negatively if you constantly change URLs.
A good example is my post on 6 Good YouTube Video Ideas in 2022.

My URL read as socialmarketingwriting.com/youtube-video-ideas

As the keyword is “YouTube video ideas.”
In the future, I plan to add items and change the date each year. When I do this, I won’t need to change the URL. I can simply change the number in the title and post, as I mentioned the year there.
This way of updating posts is necessary, as Google rewards fresh content. If you keep updating with new content, Google will often move your posts higher up the rankings. You will learn more about this later in the post.
How to write the blog post metadata:
Metadata includes the information about your blog post that people see on search engines. Here’s an example of metadata.

They help search engines identify what your post contains. It’s part of the ranking algorithm.
The metadata consists of a title and a description. The meta title should be fewer than 60 characters long, as Google only displays about 60 characters. So, write a shorter version of the title you used in your blog headline and add it as the meta title. You might want to make it even shorter if you plan to add your company name to the headline.
You can use the same title you used in your blog posts if it is fewer than 60 characters. And make sure you include the keyword in the meta title.
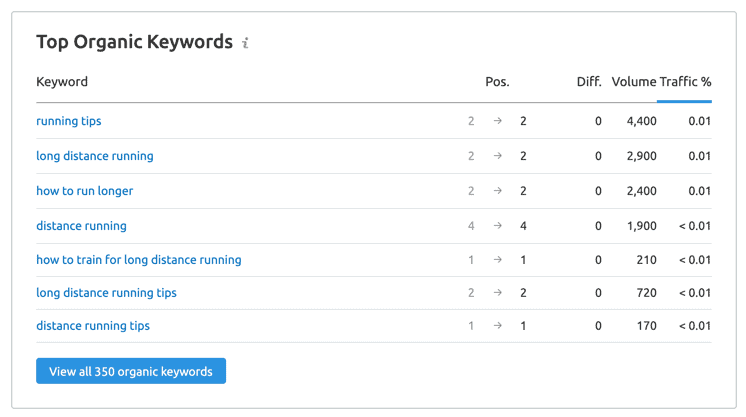
An example of a good meta title is this one.

It leads to the post on long distance running that I mentioned earlier.

You will find one headline on the post and a different one in the meta title. They optimized the meta title for the keyword “running tips” and the post headline for “long distance running.” They also placed both keywords several times throughout the rest of the content.
And it ranks well for both.
You should also add a meta description. This is the short paragraph below the meta title.
Google displays about 160 characters of the meta description in the SERP. You need to limit it within that. Here, too, you should include the keyword.
Pages with a meta description get a higher average CTR than pages without it.
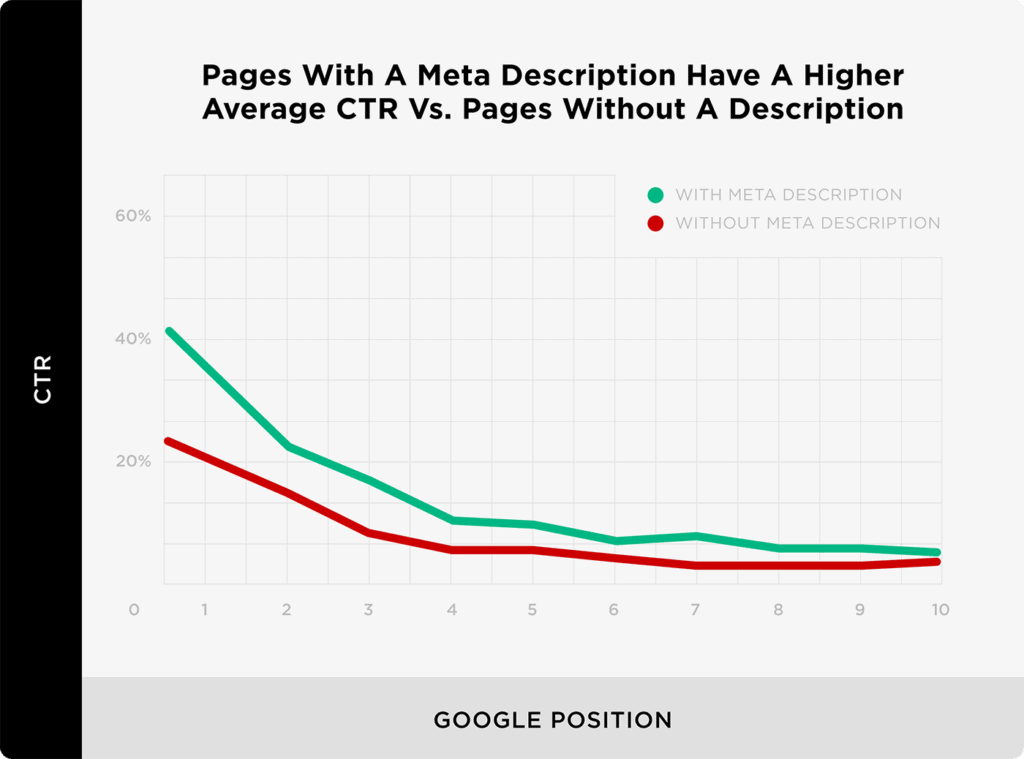
If you don’t write the meta description, Google will just pull content from your post and use that. This will help, but your CTR won’t be as high.
Your CTR needs to be high, as it is one metric the Google algorithm considers in ranking pages. If your CTR is high, it indicates to Google that people want to read your content, and it is more relevant than the others. So, Google will move it higher.
Siege Media increased its clients’ CTRs by 20%+ by just optimizing the meta title. It also improved rankings.
Therefore, spend ample time writing your meta title and description.
Think about what your readers want and then share that in the title and description. But don’t reveal too much, as they should want to click the result and visit the post to read the rest. Your aim should be to get as many clicks as possible. The headline and the other components of the article will do their job of getting them to read the rest.
To measure metadata performance, you can use Google Search Console. It’s a free tool from Google that shows you how many impressions and clicks your posts get on the SERP.
You can use it to find the impressions-to-clicks ratio every time you change the meta title and description. This data will eventually help you choose the best-performing versions.
To add the metadata to your blog posts, you can use a free plugin like Yoast.
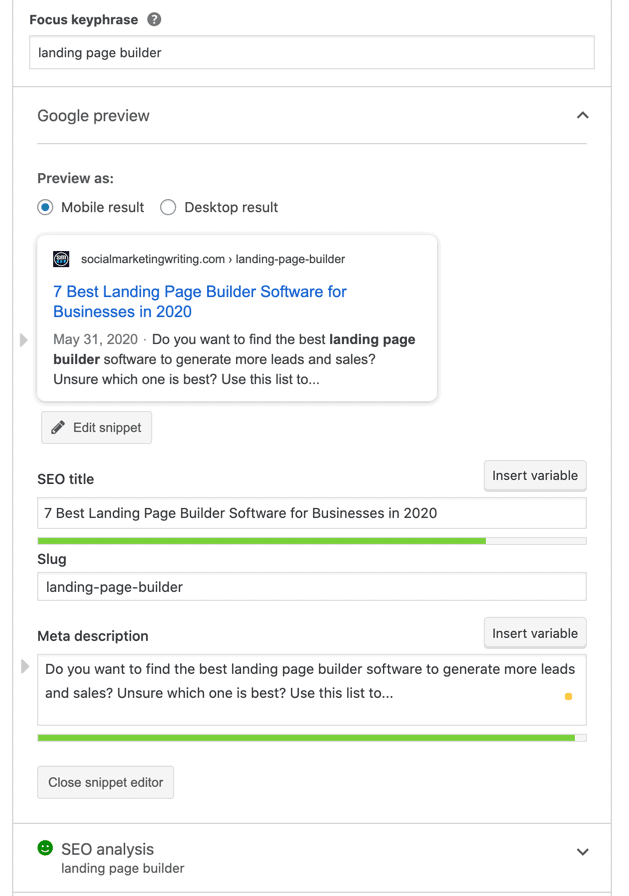
Yoast will also analyze your metadata and the rest of the post and let you know how to optimize it better for SEO. If you get a green smiley face, it means you did a good job.
I like to write meta descriptions like the above where I ask a question my audience wants to hear and then offer a short answer, but don’t complete it, so they have to visit the post to learn.
This is just one technique. There are so many more copywriting techniques you can use to get more clicks; experiment to see what works best for you.
Creating the blog post cover images:
Add attractive cover images to the top of your posts, as they can generate attention. You should also attach these cover images to the metadata, as the images will then appear as thumbnail images when the posts get shared on social media.
This is necessary, as a study found that posts with thumbnail images attached to the posts get over three times more shares on Facebook than those without them.
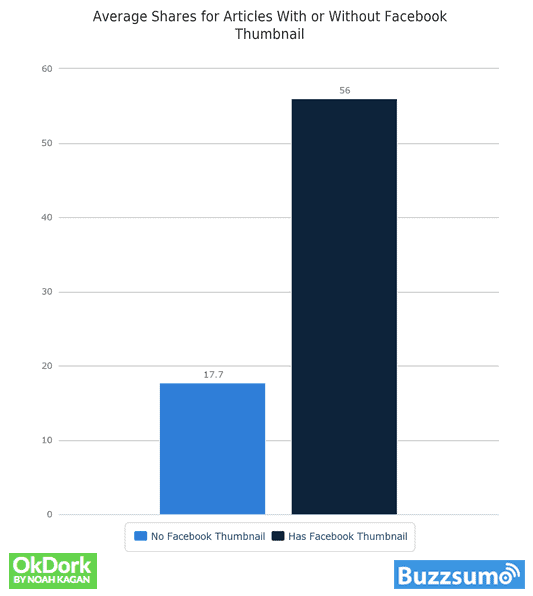
Adding a thumbnail will also get you more shares on Twitter.

And adding at least one image to a post will double the total shares it gets.

To create this image, you can use the same dimensions that Facebook recommends for its ads. This image should be a minimum of 560 X 292 pixels or a maximum of 1200 X 628 pixels.
Make sure the image is relevant to the post. It can also contain the title, as this helps people learn what the post contains.
This Leadpages post on How to Turn Leads Into Clients has a great example of a Facebook-optimized thumbnail.

On the post, the cover image doesn’t have any text. But it has photos of the people who took part in a webinar related to the post, as the post is a recap of the webinar.
But when you click the Facebook share button on the post, it pulls an image with the post’s title, as they set a different image for the thumbnail.
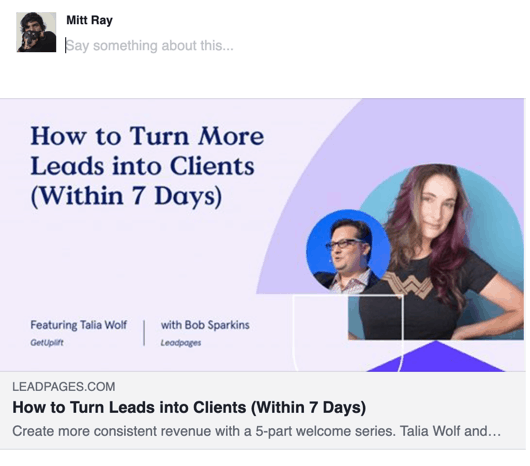
Even if they don’t add the title to the image, it won’t be a problem, as people can still read it in the Facebook link title. But the headline on the image just looks more attractive.
You can get the blog to pick the right image by using a plugin like Social Snap. I use this for my blog.
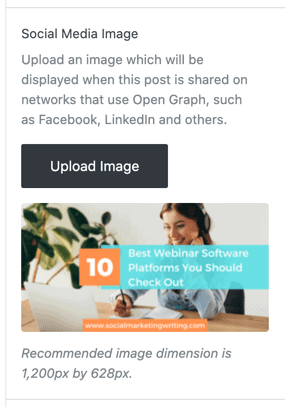
After you upload the post, you can go into the Social Snap settings and add the social media image, title, and description. You can also use a video if you prefer.
Most blogging platforms have this feature built-in, so you can add the image even without a plugin, or by changing the metadata manually.
This image will get picked when you share the post on Facebook, Twitter, and LinkedIn.
You can check if Facebook picks the right image with its debugger tool.
Along with this image, create an image for Pinterest. Pinterest might have fewer users than some of the top networks, but as this graph from Shareaholic shows, it is the social network that drives the second-highest traffic to publishers.

Traffic from Facebook is dwindling, but traffic from Pinterest is increasing. And remember that a lot of that Facebook traffic is from ads.
So, create a separate Pinterest optimized cover image if you want traffic from there too. This needs to be a tall image with an aspect ratio of 2:3, as Pinterest recommends it. The ideal Pinterest image size is 600 X 900 pixels.
Here again, you can take a photo(s) and add the headline as overlay text to it or use a plain background with text and illustrations over it. Pinterest is a visual network where people go to look at images. So, your images should include all the information.
This Homemade Brownies recipe post from Lil’ Luna is a good example.

I can find the title of the post, photos of the recipe, and the branding in big clear letters on the image itself. There’s no need to read the description. People can just click the link that appears when they hover over the image and visit the post.
To ensure this image gets picked when people click the share button, you can use Social Snap again.
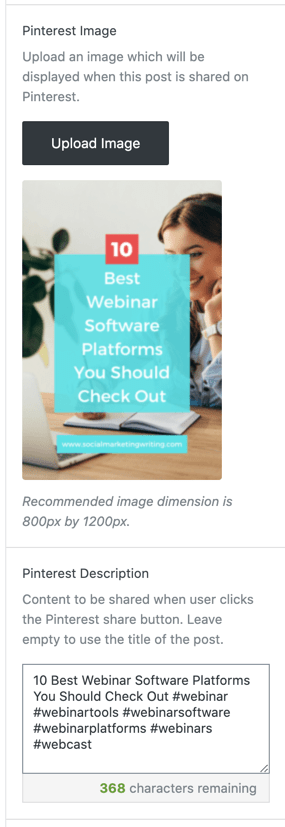
It lets you add not only the image you created for Pinterest, but also the description. They will get automatically added to a pin every time someone clicks the Pinterest save button.
Remember that many people will use the Pinterest browser extension to save your page to Pinterest, and they get a choice of all the images on the post to save. To limit the images they see, use a tool like WP Tasty.
You can use it to show only the Pinterest image(s) you created when they click the browser save button.
You should also place this Pinterest image at the end of the blog post.
But remember that using large images (file size) in your blog post can have a negative side effect, as they can increase the loading time. Slow-loading pages rank poorly on search engines as loading time is a ranking factor.
Also, loading time can affect conversion rates and the time people spend reading, as they don’t like waiting for more than a few seconds. Therefore make sure your blog posts load quickly (within 3 seconds at most), even when you use many images.
I do this by hosting my site on WP Engine as it is the best WordPress hosting service.

Here are the reasons why I use WP Engine.
I also use a tool called ShortPixel that automatically reduces the size of all the images I upload to my blog without sacrificing quality.

You can use them to create highly shareable cover images in minutes.
You will also get my perfect blog post template.
How to write the blog post introduction
The headline will help attract attention. But after that, it is the job of the introduction to hook the reader and read the rest. You need to find the right hook that will work for the people who read your post.
A simple way to hook your audience is by sharing a stat or a few that are relevant to the topic of the article. They should confirm what you say or are about to.
Right now, trust in the media is at an all-time low. It has dwindled to 43%. There are many false news stories online, and people are getting scammed. If you want people to trust what you say, you need to share relevant studies and stats from reputable sources that confirm that you are talking about a legit problem or situation.
For the best effect, share a study that confirms that many people do something you want your audience to do too.
This is why everyone (including me) likes to buy the products with the most 4- to 5-star reviews on Amazon.
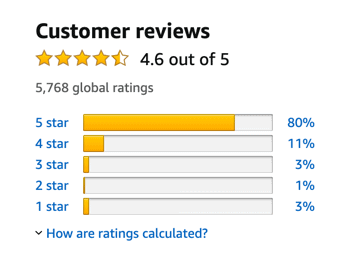
It’s the same reason people go to restaurants with big queues and avoid ones that don’t. By the way, I did try the contrary once and visited a restaurant that had no queue, asking myself how bad it could be, as I was in a hurry. And it can be that bad.
When you see many people doing something, especially people you know or look up to, you want to do it too.
So, if you share a statistic that shows many people do something good that your audience should do, too, they will be more likely to act. You can see an example of me using stats correctly in the introduction to this post.
I shared that more than 70 million blog posts are published every month. I started with it, as I knew that many people reading this post are brand new bloggers, beginners, and intermediate bloggers who might be discouraged with their blogging efforts and might be afraid of putting their thoughts in public.
Seeing that several tens of millions of posts are published every month by other people just like them will help them feel more comfortable about blogging.
But I followed it with the stat that the median blog post gets just four shares and one backlink.

I added this piece of data to tell my readers about the reality of blogging. I wanted it to be clear that blogging is popular, but it isn’t easy, and they have two options.
One is to blog for fun as a hobby, while the other is to put in more effort into their blog writing process. This helps my post attract the right kind of readers. If you are still reading this post, it’s because you want to run your blog more seriously.
You want to drive more traffic to it and convert it to subscribers and sales. You don’t see it as just a hobby.
Another way to hook readers in the intro is by informing them that the tips and strategies they are about to read have worked for you before. Make sure you share details about the results in the post itself or link to a case study. It can boost social proof and get people to pay attention.
I did this, too, in this post’s introduction by sharing an example about how my post for Sumo performs on Google.
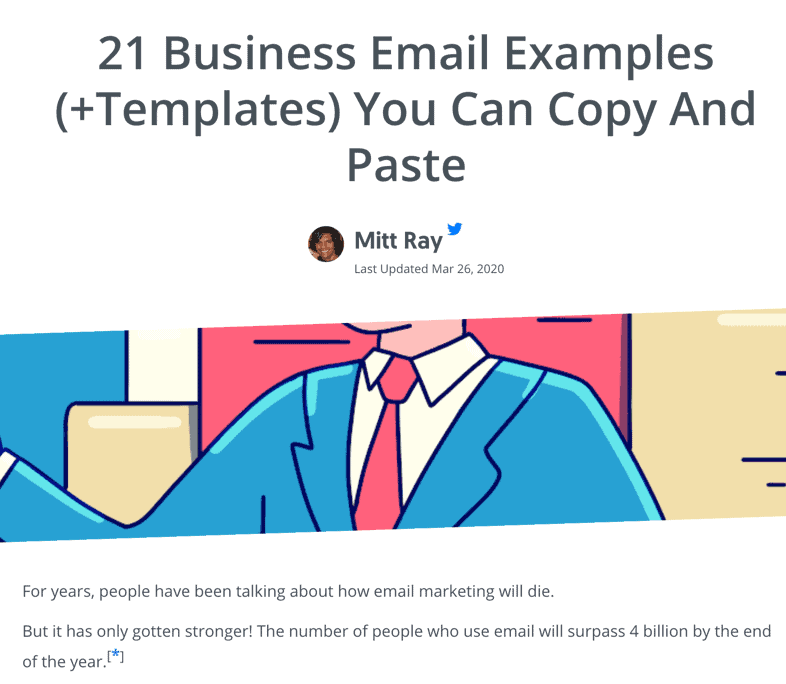
I also wrote about how posts on my blog get shared several times.
If you don’t have any samples or experience on this topic, you can share a case study or an example of how someone else used the tips you share to get the result.
But make sure you let people know that you didn’t help them get this result (if you didn’t).
I used both statistics and examples in the intro of the post. But you don’t always have to use both. Either should work, but using both will have a much stronger effect.
After that, you can briefly explain what people will learn in this post. You can then end the intro with a call to action that asks people to read the rest.
Writing the main content:
After the intro, write the main content of the post and share the information you promised in the introduction. The post needs to answer all the questions your readers have. So, picture them while doing this. Here are my top tips for writing the main blog content.
Include a definition section if necessary:
If your reader may not understand the topic, you need a definition section that reads something like “What is…?”.
This will give a quick definition for people who want to learn more about the subject, while those who already know can skip it. It can also help you earn a featured snippet spot. This is position zero, the topmost spot on the SERP.
You can see an example in the post, The Beginner’s Guide to Intermittent Fasting, by James Clear.
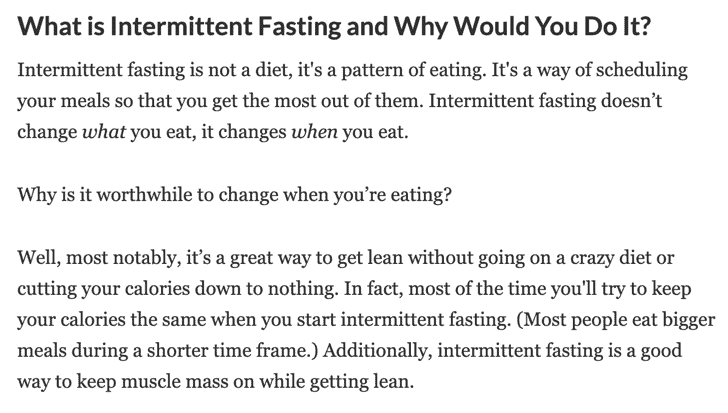
Here he shares a quick definition as he wrote the post for beginners who probably don’t fully understand the topic. If the post was an advanced guide to intermittent fasting, then a definition section won’t be necessary.
Sometimes, instead of (or after) the definition section, you can add “An importance of” section where people can learn more about the importance of what they are about to learn, as some readers might want to know if reading the post is worthwhile.
Divide post into sections and share tips under each:
Next, list the points you plan to discuss in the blog post; these will be the main headings of the post. There are several benefits to doing this.
The headings give an organized outline to the post, make it easy for the reader to skim, and prevent you from leaving out an important point. When you add subheadings as H2 and H3 tags to the post, they help the post get more traffic, shares and backlinks, as 36% of articles with H2+H3 tags achieve higher performance in traffic, shares, and backlinks.

So, add your main keyword and a few of your high-volume secondary keywords as subheadlines throughout the post. And make them H2 tags.
This will become your main body content outline.
Then below each section, you can share all the answers you promised in the introduction. This will help you write an organized blog post that readers can follow easily.
You can see an example of this in my post on How to Become a Social Media Manager. It’s a 5,000+ word post.
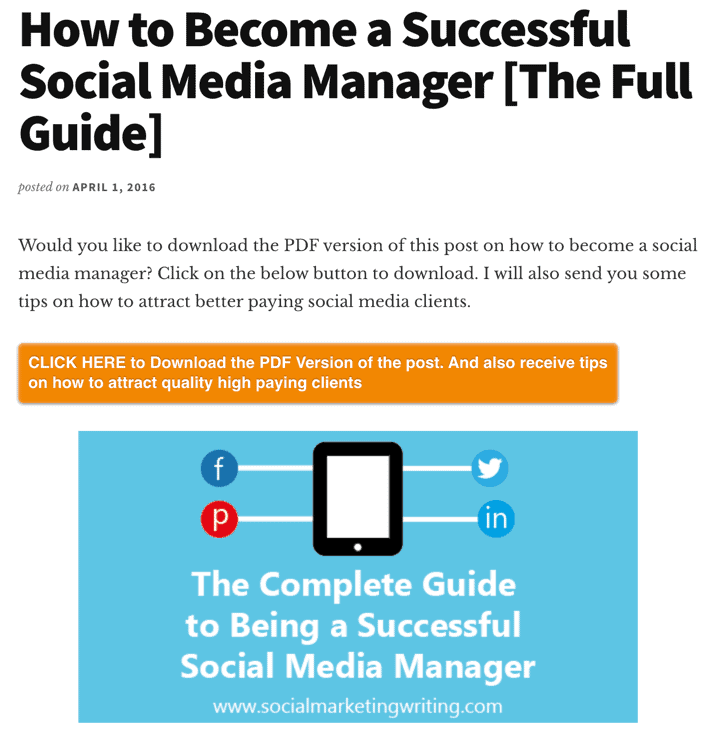
There are several subheads, and there are even more sub-subheads under them. This formatting makes it easy for people to read. If I just wrote the post plainly without any subheaders, it can seem tedious to read.
Subheaders help organize the post and make it easy for people to find what they want to read. They also make it easy for people to take breaks and get back to where they left.
Share your secrets:
What do you want FROM your blog post? Do you just want traffic, or do you want people to read your posts, sign up to your list, and buy your products?
If getting traffic is your only goal, you can do some keyword research, write an optimized post, build backlinks, and promote the post with other methods and drive traffic. But this traffic won’t pay the bills unless you get a lot of it and use ads to generate revenue.
What pays the bills is sales? And a fluff piece won’t get you sales, no matter how much traffic you drive to it.
To get sales, you need to write one of the best posts out there. As I mentioned earlier, blogging has become very competitive. There are over 70 million blog posts published every month. Several of them publish great content.
Your content needs to be better than theirs. People need to read your content and go “this is wonderful! I have never read anything like this.” This will spur them to read more posts and sign up for your list. It will build your brand as a thought leader, and people will want to buy your products or services.
So, put a lot of time into creating the best content out there.
One way to do this is by sharing your secrets. Most people are afraid to give away secrets. They think that if they share their secrets, people won’t buy their products or services.
People will indeed use your secrets to get results. But these results will convince them that you share the good stuff. They will want to work with you to see what else you can help deliver.
Also, remember that many people won’t have the time to implement the secrets you share. And there will be others who wouldn’t want to go with the experimentation phase and lose time and money. They will want quick results.
These people will know that even if they use your secrets, they won’t be able to do it as well as you. So, they will hire you or will buy your products.
An example of someone who has had great success with sharing secrets is David Ogilvy. He regularly shared his secrets in advertorials like this one on launching a product.

And this one on advertising.
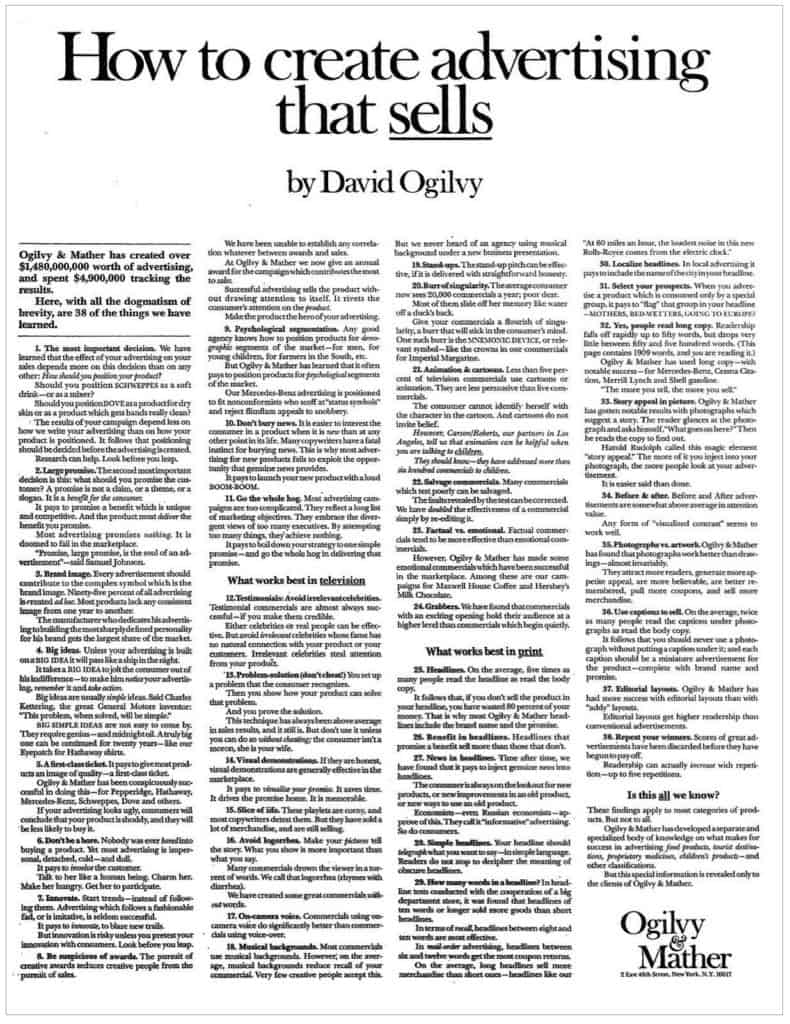
Back then, this was a lot of useful information, and it is still relevant today. People read these advertorials and realized that “David knows his stuff.” So, they hired his firm to help them with their advertising and marketing.
These were instrumental in helping David build a multimillion-dollar agency.
Share examples and stats and link to them:
Just like in the introduction, include statistics and examples in the main content too. If you want people to trust the tips you share, you need to back it up with data/stats that show what you share will bring a positive result.
To make it easy for people to picture things even better, share examples of others doing it; this will help them implement what you teach.
This is why I have shared several examples, case studies, and statistics through this post.
Make sure you link to the examples and statistics in your posts so that people can check them out to verify the source. Linking out to sources will also help your post rank better on search engines.
Google likes to rank content with more links pointing out because it shows that this is an authoritative piece of content linking out to other relevant sources.
When you mention others’ content in a blog post, you can reach out to them and let them know. People like it when this happens, and it will help you build a strong relationship with them.
Many readers will return the favor by linking back to your content or sharing. An example is in my post on 13 Ways To Drive More Traffic From Facebook.

I mentioned many top marketers and bloggers in my post and informed them.
Many of them liked the post and shared it. It ended up getting a lot of shares and traffic.
Also, make sure you link to other relevant blog posts on your blog. This will reduce the bounce rate and make it easy for readers to find other content that will help them. Internal links can also help with SEO.
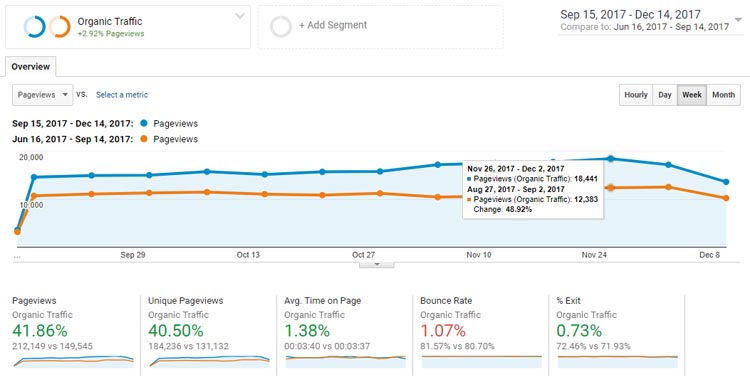
Ninja Outreach increased their organic traffic by 40% by building internal links.
Add images:
I already mentioned that you should include cover images in your posts. But along with these, include more images and even videos (if you find something relevant) throughout the post.
Images will not just help break up the sea of text and make the posts easy to read, but they will also help the post generate more traffic.
As posts with more images get more shares, go ahead and add a lot of them! Buzzsumo found that posts with an image once every 75 to 100 words get the most shares.

The images you share can be graphs, screenshots, illustrations, photos, etc.
When you share a statistic, try to represent it with a graph, and when you share an example, you can use screenshots. And occasionally, you can add illustrations and photos relevant to the topic of the post.
Optimize for SEO:
If you follow the above tips and add the keywords to the title, subheads, URL, and metadata, you will optimize it for SEO. But that alone won’t be sufficient. Here are more ways to optimize posts for SEO.
The primary keyword should be at least 1% of the post
Your main keyword should appear once every 100 words. So, make sure you check that the keyword density is good enough.
Use secondary keywords too:
The primary keyword is the main keyword you will optimize your post for, but along with this, optimize your post for several secondary keywords. These keywords by themselves won’t drive as much traffic as the primary, but together they can generate a substantial amount.
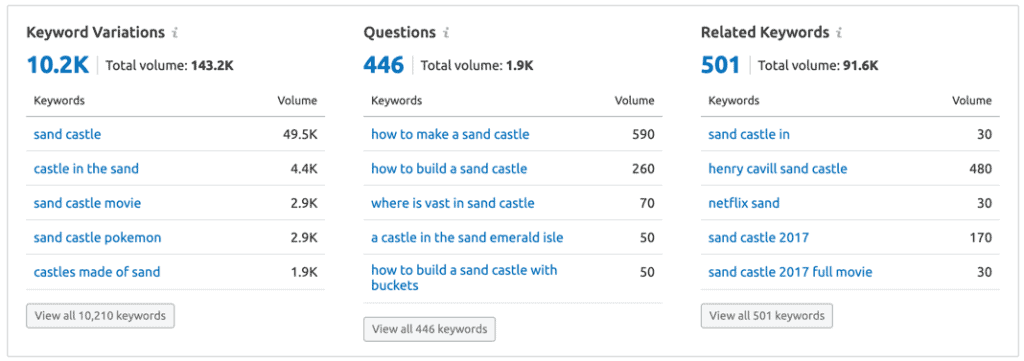
Optimize your post with these. Each of these keywords should appear just one or two times in the post.
Add keywords to images:
You should also add your keywords to the images as image alternative text.
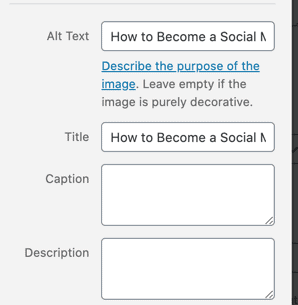
This should include both primary and secondary keywords.
To help optimize your posts for SEO, you can use a tool like Clearscope or Marketmuse. All you need to do is add your primary keyword to it, and the software will suggest the secondary keywords you need to add, the density of primary and secondary keywords, and which keywords should place in headings.
It will even grade it.
Write the conclusion:
After you write the main content, you can write a conclusion. This is optional as sometimes blog posts don’t need a conclusion. They can just end with the main content.
But if you do write a conclusion, what you include is up to you. You can either write a simple one, where in a few lines, you briefly tell people about what they just learned and what they need to do next, or you can write a detailed one.
In a detailed conclusion, you can offer a recap of everything they learned in the post, like in this great article on the 10 Things that 3 Customer-Centric Brands Get Right by Katie Kelly at CXL.
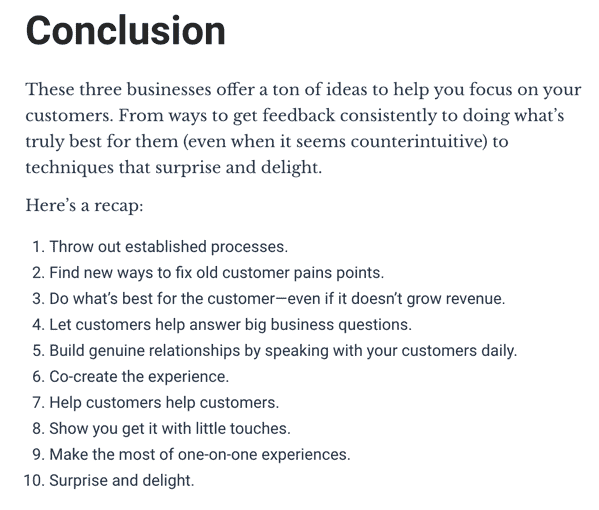
The one you choose should depend upon the blog post and the target audience.
End with a call to action:
Most people like to end the blog post with the conclusion. But you need to add another bit right at the end.
This is the call to action.
The call to action should get people to take a step that will benefit you the most. You can use a call to action to get a comment, share, sale, or a sign-up.
To get comments, you can simply ask the readers what they thought about the post and ask them to leave a comment below in the comments box. You can see an example of it in my post for Social Media Examiner.

If you want to drive traffic, you can ask people to share the article on social media.
If you want to drive sales, you can ask people to buy a relevant product and add the link to it. An example is this one from Zappos.
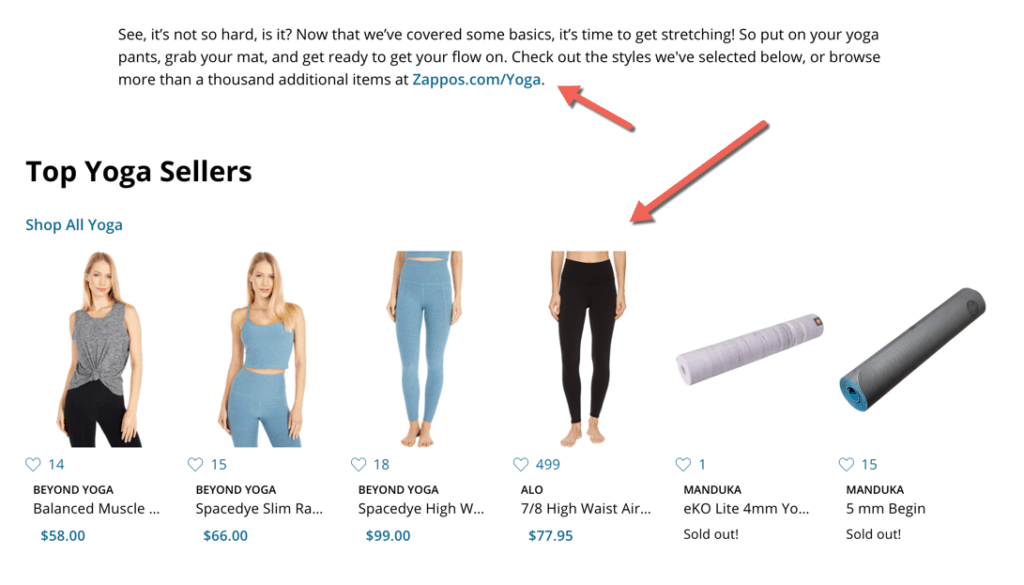
It’s a blog post on how to begin your yoga practice. So they added a link to a page where people can buy yoga products, and they included images and links to individual products below.
Only promote your products directly in the post if they cost less than $100. If they cost more than that, you shouldn’t send people to a product page. Instead, get them to sign up to your list.
This will allow you to warm up your leads with more content, build trust, and get them to purchase more expensive products. But, if you are already sending warm traffic to the blog post, you can promote more expensive products directly in it.
To get people to sign up for your email list, offer a lead magnet like an ebook or a white paper or a video course or a free guide in exchange.
For the best results, use a content upgrade, which is a special lead magnet that you create for just one blog post. It needs to be highly relevant to the topic of the post.
The more relevant it is, the higher your conversion rate will be. You can see an example in my post on How to Create YouTube End Cards.

As the post is on YouTube end cards, I offer a couple of YouTube end card templates as the content upgrade to simplify things for my readers. The conversions are very high as it is highly relevant to the topic of the post.
A good content upgrade can help you achieve conversions rates of up to 25% from my experience.
They are easy to set up, as there are several tools to help you with this. I have done it with both OptinMonster and Leadpages.
You don’t have to use all four types of calls to actions in every blog post. I recommend that you only use one or two, depending on your goal. If you use too many calls to actions, it will lead to decision fatigue, which can overwhelm readers, and they won’t take any action.
And finally, don’t forget to go back and switch the placeholder headline. Write 10 new headlines and pick your favorite.
12 more top tips for writing a blog post
If you follow the above tips, you will write a great blog post. But to do even better than great, use the 12 tips below to improve your post.
Write long blog posts:
To generate the most traffic from your blog posts, you should make them long. When I say long, I don’t mean 1,000 words. I am talking about a word count of over 3,000.

The study from SEMrush found that blog posts that are 3,000+ words long get three times more traffic, four times more social shares, and 3.5 times more backlinks than posts between 901 and 1,200 words.
They perform better because people prefer sharing and linking to content with more information.
The backlinks and Google’s preference toward long-form content pushes the post toward the top of the SERP.
Also, when you write long posts, you have more opportunities to include more keywords and external links. You can space them out without concentrating them in a few places.
But these posts should be filled with top-quality content from top to bottom. You shouldn’t write a long post just because you have to and stuff it with filler content.
So, make sure you pick meaty topics, do a ton of research, and then write a post with the best content.
Most top bloggers out there already know that long-form content does better. This is why the average blog post length goes up every year, as found by Orbit Media.
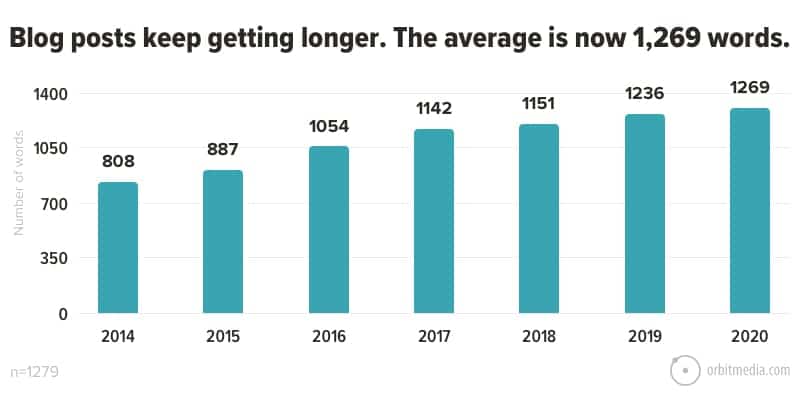
Right now, the average length of a post is 1,269 words. And the number of posts fewer than 1000 words is dwindling, and the number of posts greater than 1,000 words is going up.
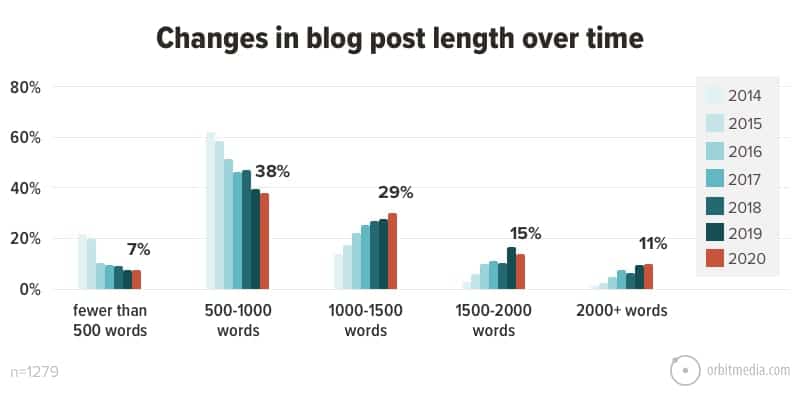
So, if you want to outdo the competition, I recommend that you write 3,000+ word posts. This will help you stay ahead of the competition for a few years.
Simplify the writing and improve readability:
People are very busy these days, and their lives are full of distractions. If they discover your blog post through a search result, the other posts on the SERP will be on their mind. While if they discover your post through social media or email, the other posts and emails in their feed and inbox, respectively, will be on their mind.
Internet users are active on seven social networks on average.
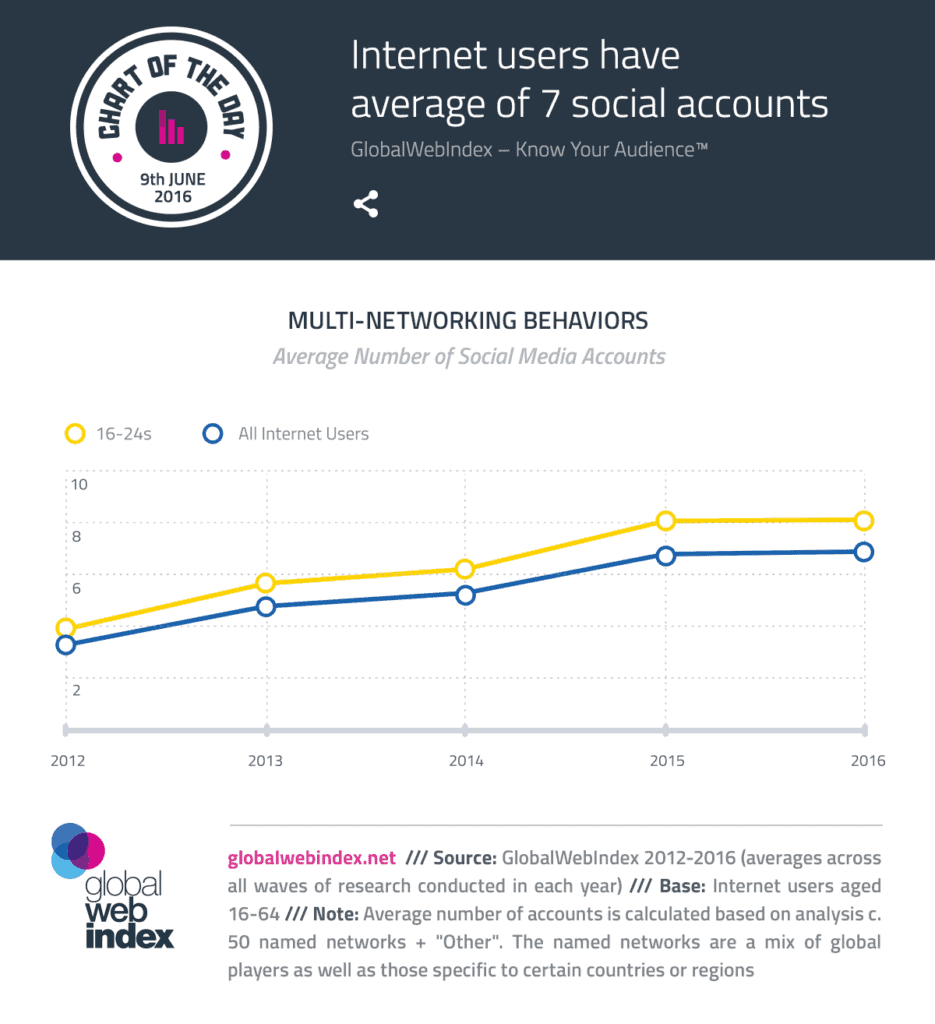
They will want to catch up with the content in all these places.
They will be in a hurry to read your post as quickly as possible. To hold the readers’ attention, simplify the reading to a 5th to 7th-grade level.
The simpler the writing is, the more the number of people who will finish reading the post all the way through. If your writing is complicated with many sophisticated words, passive voice, and long sentences, they will lose interest and find another piece of content.
So, after you finish writing the post, simplify it up. To do this:
- Replace uncommon, difficult words with plain language
- Change most passive voice to active voice
- Reduce sentence length – use short sentences
- Write short paragraphs that are 2-5 lines long
- Use bullet points if possible
To help simplify writing, you can use a free tool like Hemingway. Just copy and paste your text into it, and it will recommend how to make it easier to read.
Grammarly can also help with this.
It will show you where you can improve your writing and also underline all instances of passive voice.
Make your posts scannable:
Two kinds of people will read your post: detailed readers who want to read every bit of it, and skimmers who just want to read the significant bits.
Writing a post normally will make it suitable for detailed readers. But if you want skimmers to have a good experience too, make your posts scannable.
You can do this by using many subheads and making the notable bits stand out with bold letters and italics.
Adding a table of contents as I did here in my post on How to Write a White Paper will also help.
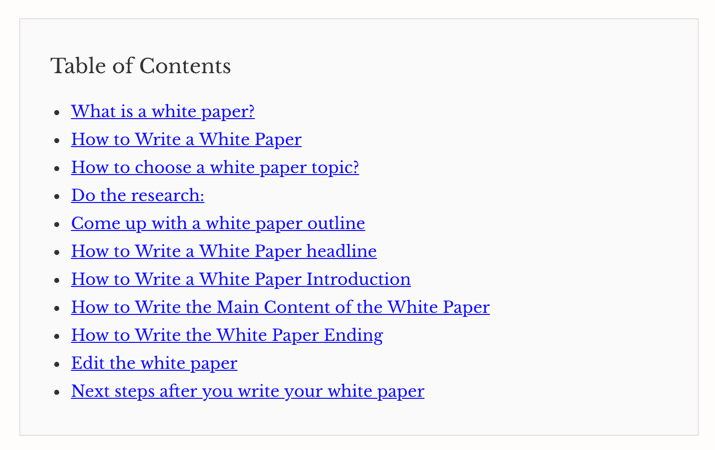
People can click the table of contents and quickly find what they want. They can come in handy when reading long blog posts.
A table of contents can also help with SEO.
You can easily add a table of contents by using a plugin like Ultimate Blocks. I used it to create the above table of contents. It’s free.
Proofread and edit several times:
After you finish writing your post, proofread and edit it several times to improve tone, flow, and fix grammatical errors. This will make it easy for people to read and will make your post look more credible.
Read through and edit it at least two or three times. If possible, hire an editor to help you with the editing. It will make a massive difference.
Using a free tool like Grammarly will also help.
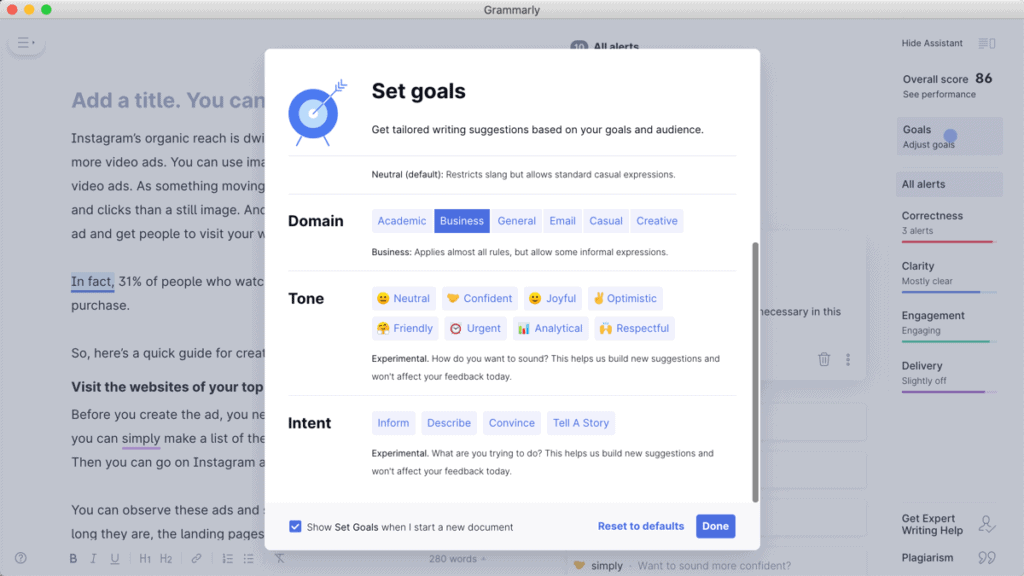
It will find all the grammatical errors in your post and provide suggestions on how to fix them. It will also offer additional prompts on how to improve your writing.
Add categories and tags:
When you upload the post onto your blogging platform, add categories and tags, as they make it easy for visitors to find the content they want to read.
They can also improve site structure and make it easier for search engines to index your site and rank higher.
Optimize for sharing:
Most bloggers share their posts on social media. But this alone won’t drive a lot of traffic. You get more traffic when the people who visit the post then share it with their followers, and then their followers do the same and on and on. It creates a snowball effect, and your posts end up getting a lot more shares.
This is why you should optimize your posts for sharing. The easiest way to do this is by adding share buttons.
A study found that posts with a tweet button get seven times more tweets (mentions) than those that don’t have them.
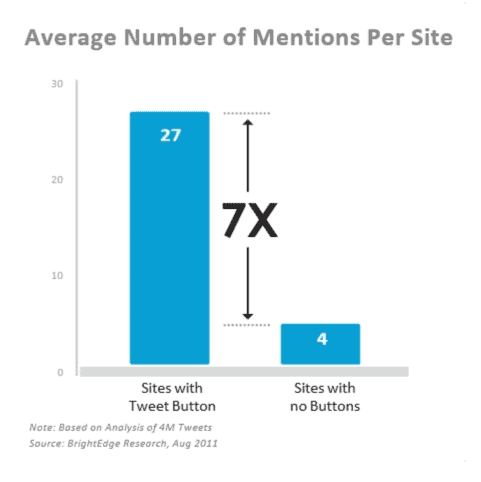
So, add the share buttons for the networks that already drive the most traffic and shares to the blog posts.
I use a plugin called Social Snap to add share buttons.
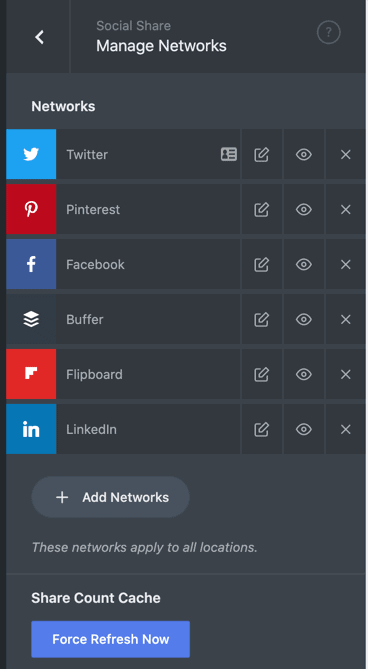
I add the buttons to the bottom of the post, and always-visible floating buttons to the left of the post. You can see them to your left right now.
Floating share buttons are great additions to long blog posts, as not everyone will read the whole post, but may still want to share it.
I also like to display share counts, as they can help attract more readers and backlinks.
Shares add social proof and boost credibility and indicate to readers that this is a good piece of content and many people like it. So, readers will want to share it, and bloggers will want to link to it. If you get a lot of shares, you should turn on the share count.
If your content isn’t getting many shares, you might want to try using a content distribution platform such as Quuu or Triberr.

You can submit your posts here, and they will show it to some of the biggest influencers and bloggers in your niche. Some of them will share it with their followers.
Another button to add is the image share button. This is where a share button will appear when people scroll over an image on the blog post.
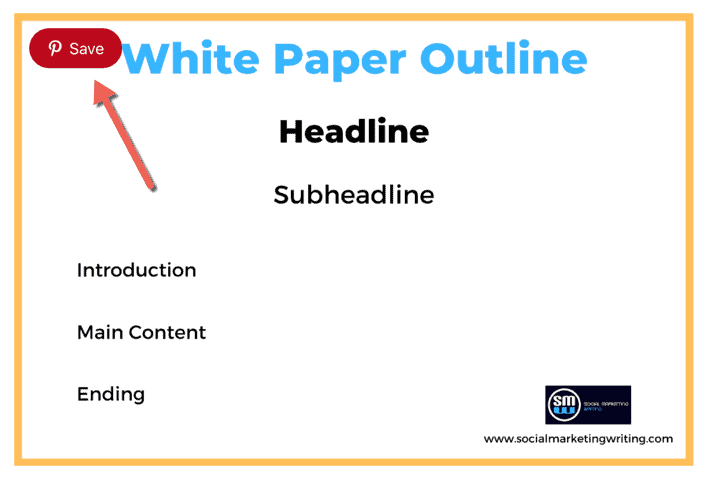
These can increase shares. You will see it when you scroll over an image on this post.
I use Social Snap to add these buttons too.
Optimize for mobile:
Make sure your posts are optimized for mobile reading too. You can do this by using a good mobile optimized theme. I use a StudioPress theme as all their themes are optimized for mobile.
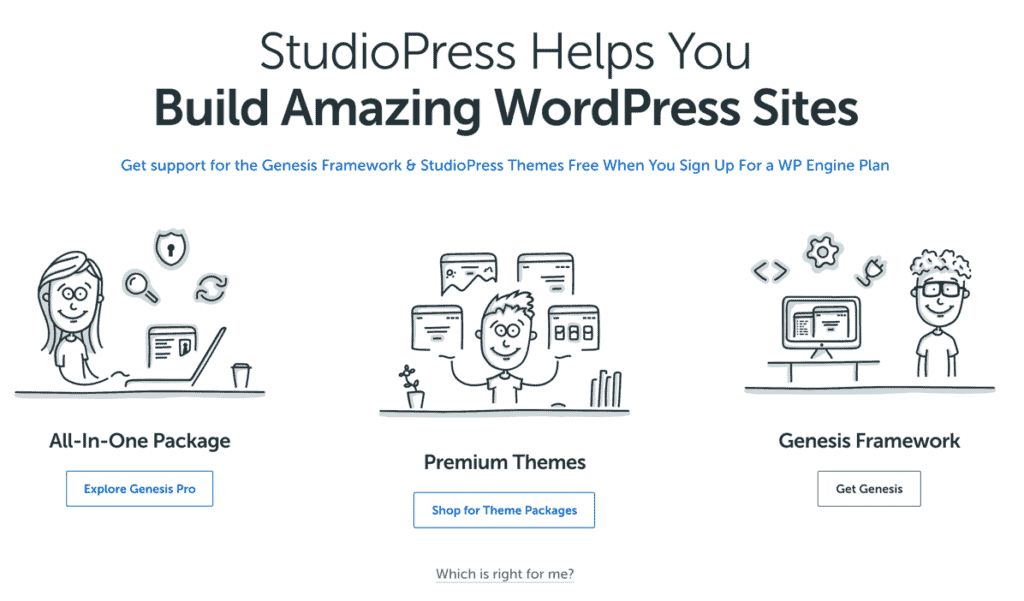
You can get them all for free if you use WP Engine to host your site. I got the current theme I am using for free too. I had to buy my first theme, though.
Optimize for conversion:
As I mentioned earlier, adding a content upgrade at the bottom of the post, and using a call to action can help get sign-ups. But you need to apply more optimization strategies to get even more sign-ups.
This includes placing the content upgrade at the top and in the middle of the post, too, as I did here.
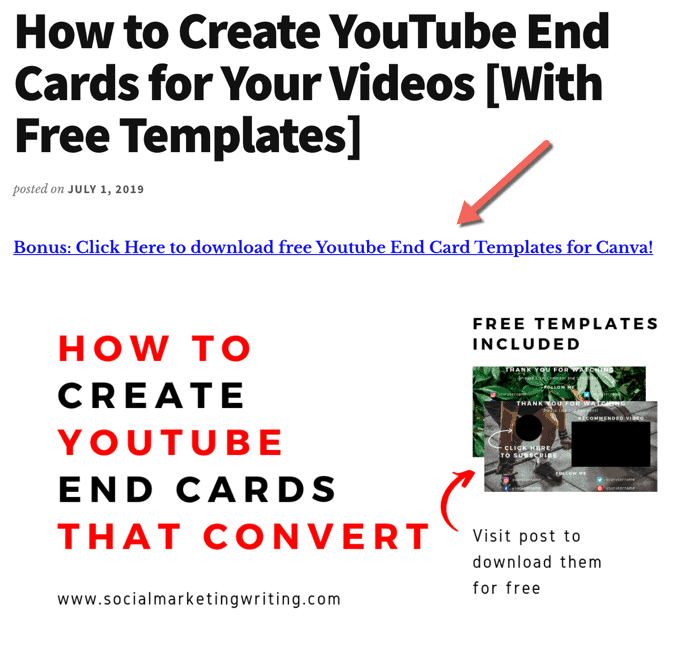
Also, use opt-in forms such as pop-ups, welcome mats, and sidebar forms to get more sign-ups.
These, along with the content upgrade, will get you even more leads. But make sure you display relevant pop-ups and offers on each post.
I do this to get maximum leads from my posts. For example, when you started reading this post, you might have seen a pop-up for a blog post template, as this post is on blogging. But when you read an Instagram-related post on my blog, you will see a pop-up promoting free Instagram images.
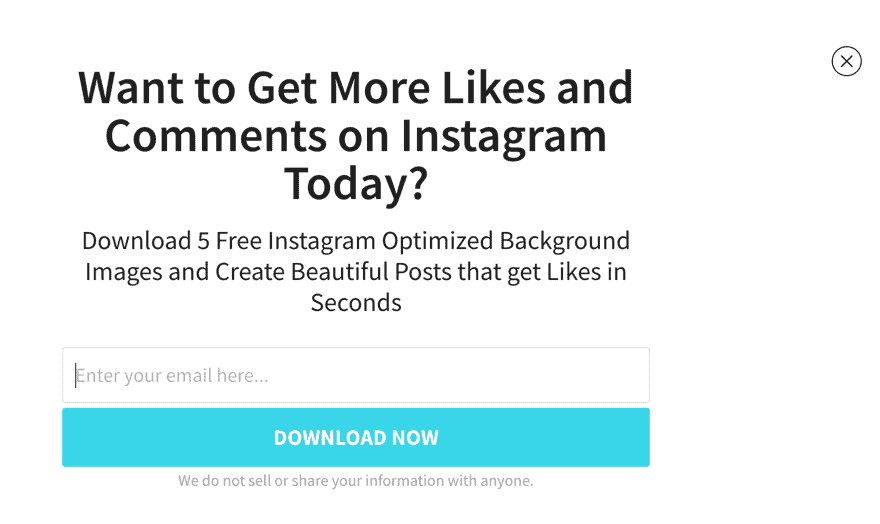
And when you read a post on Pinterest marketing, you will see a pop-up related to Pinterest templates.
This way of using relevant pop-up offers helps me achieve a high conversion rate.
You, too, should begin promoting relevant offers on your blog posts today. You can set up this level of pop-up targeting with OptinMonster. I use it.
Optimize for monetization:
Again, if you add a call to action for the product at the end, you will be optimizing your post for monetization. But there are many more things you can do to monetize your posts better.
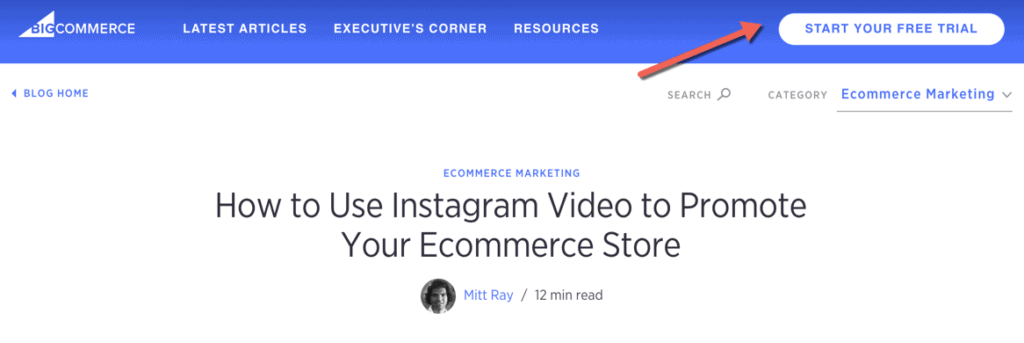
This can be with advertisements placed at the top of the post in the header like in this post on BigCommerce.
And in the middle of the content like in this post on Social Media Examiner.



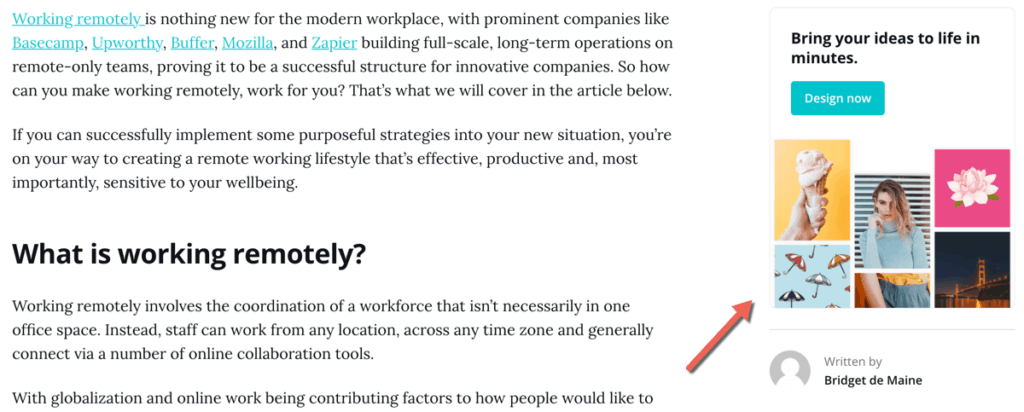
And with advertisements in the sidebar like on Canva’s blog.
You can also monetize your posts by linking out to affiliate products. Displaying ads can also help generate revenue. But you will need a lot of traffic to earn enough from ads.
Regularly update your blog posts:
70% of bloggers regularly update their blog posts.
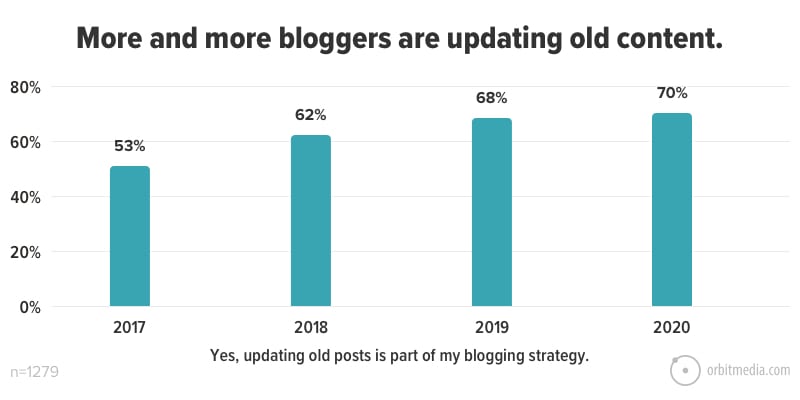
They chiefly do this because readers want the best, most up-to-date content out there. The more current the content, the more likely they will be to read it, share it with their followers, and convert.
Also, if you regularly update your content with new text, Google will reward you. The search engine likes it when you update your page with the latest information. So, you will move up the rankings.
Therefore, make sure you update your blog posts every three months to a year, at least instead of only publishing new posts. Most changes should be to the post’s content, though you can do some research to see the latest stats and trends and add them in.
You could also do a keyword gap analysis. This is where you do a comparative analysis between your post and your competitors’ posts on the same topic with SEMrush.

Then check the keywords missing from your content, but are in your competitors’ content, and then add them to your post.
You can leave the post title as it is, or change it if you add items.
For example, let’s say you wrote a post on “10 Creative Oatmeal Recipes You Must Try,” and you added a couple more items. You will then need to change it to 12 Creative Oatmeal Recipes You Must Try.
If you added the year to the post because your keyword research showed people use it in their searches, you should change it to the latest year.
You can see an example of it in this post on 6 Tips for Successfully Selling on Instagram in 2022.

I keep changing the year to the next year toward the end of the year and make some other changes to the post. This year I will add items to the post. So, I will update the title as well.
Promote blog post:
If you want more people to read your post, promote it a lot with a wide array of techniques. You should actually spend more time promoting your post than writing it.
Monitor blog post with analytics and heatmaps:
After you publish the blog post, monitor it with analytics and heatmap software. Free tools like Google Analytics and Hotjar can help you with this.
Google Analytics will help you check your post’s conversion rate, bounce rate, time on page, etc., while heatmaps will help you see how much people read, where they click, where they exit, etc.
You can use this data to improve retention and to get more people to convert, and to write better posts in the future.
Now use the step-by-step guide to write your blog post
This is my step-by-step guide to writing a blog post. You need to start the process by searching for topic ideas with a lot of research.
After you have a topic that your readers will like and is popular on both social media and search engines, you can begin writing it. You need to first write a temporary headline. After that, you can write the introduction, main content, and conclusion.
You can then end it with a call to action. After that, you need to write 10 more headlines and pick your favorite.
But before you publish, write the URL and metadata and create cover images.
Yes, this is a lot of work and can take some time.
This is why to simplify things for you, I have created a simple blog post template. It can help with everything from writing the headline to the conclusion. You just have to open up the template and quickly fill in your blog post content. Anyone can do it, and it will save a lot of time.
There are also four free blog post cover image templates to help you create highly shareable images in minutes.

The template will help improve your writing skills and even beat writer’s block. Advanced writers will save time with it and pump out successful blog posts every time.
How to write a blog post infographic
Click on the infographic to view large version
![How to Write the Perfect Blog Post [Infographic] How to Write the Perfect Blog Post [Infographic]](https://socialmarketingwriting.com/wp-content/uploads/2015/03/How-to-Write-the-Perfect-Blog-Post-Infographic.png)


If you found the above post on how to write a blog post helpful and think your followers and friends will too, please share it with them by just clicking the share buttons below.

![How to Write the Perfect Blog Post [Infographic] How to Write a Blog Post in 2020](https://socialmarketingwriting.com/wp-content/uploads/2015/03/How-to-Write-a-Blog-Post-in-2020-1024x536.png)
