A recent study by Mckinsey & Company found that email is 40 times more effective than Facebook and Twitter combined in the acquisition of customers. People continue to use email more than social media. 91% of people check their email at least once a day. This can be a powerful way to reach a lot of people.
Email has been instrumental in growing this blog as it has helped me drive more traffic and build relationships with my readers. I am always on the lookout for ways to get more email subscribers. I have opt-in forms on various places on this blog to help me generate blog subscribers. I have even created a content library where people can download free Ebooks and White Papers. One thing I have been highly keen on adding to the blog is the feature box, especially when I read how it increased Thesis blog’s subscription rate by 51.7%.
The Feature Box Does Get You More Email Subscribers…
I first hired a designer to install a feature box on my personal blog to see how it performs. It does work really well. Since installing it the sign ups on my blog increased. It’s because it’s right at the top of the home page of the blog. It’s the first thing readers see on visiting.
Plugmatter Makes It Easy to add a Feature Box…
After benefitting from the feature box, I planned to install it on this blog too. Luckily, before I hired a designer, I got contacted by Plugmatter who asked me if I would be interested in trying out their plugin and sent me a review copy. I gave it a try and really liked it as it’s extremely easy to use. There are 10 templates to choose from and it integrates with the email services Aweber, ConstantContact, iContact, InsusionSoft, MailChimp, MadMimi and Campaign Monitor. Since installing it I have been able to generate blog subscribers from it.

Now I am going to show you how easy it is to install a feature box with Plugmatter on your WordPress blog and all the helpful features it possesses. I have no idea how to code and I was able to design and install the feature box with ease.
How to add a Feature Box With Plugmatter…
Plugmatter is a paid plugin. The basic ‘Personal’ package costs $37 with this you can only install it on one website. The Professional one costs $57 as it has got more features and can be used on three websites. I think this is still a bargain, as it cost me £60 which is roughly $100 to get a designer to create one on the blog I mentioned earlier. There’s also a Developer package which would be perfect for designers and people with multiple blogs as it can be installed on unlimited blogs. You can check out all the different features the three packages offer here and then pick your favourite. Remember that the plugin is only compatible with a WordPress blog.
After you buy the plugin, you will receive an email which will contain a download link for the plugin. Download the plugin (Zip File) and if you know how to install it using an FTP, please do so. If you don’t, I am going to show you how to install the plugin directly on WordPress. This can be used to install any plugin on WordPress.
Visit the ‘Add New’ section under ‘Plugins’ and click on the ‘Upload’ option.
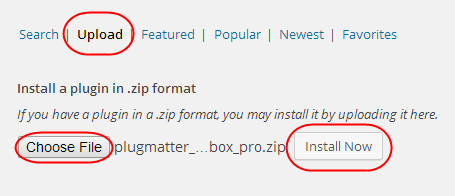
Then with the ‘Choose File’ option, locate the Plugmatter plugin on your computer or device and upload the .Zip file as it is and then click on ‘Install Now’.
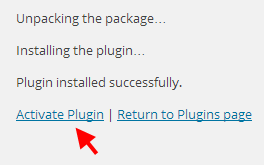
After you install the plugin, activate it by clicking on ‘Activate Plugin’.
Once your plugin is activated, the next step you need to perform is to add a line of code which will be provided to you by Plugmatter. Instructions on how to add it can be found in their User Guide. They have different instructions for a regular WordPress blog and for blogs that run on Genesis and Thesis frameworks to ensure that your feature box functions smoothly on all of them.
Once you finish entering the code, it’s time to enter the Licence key Plugmatter sent you. First visit the plugin by clicking on ‘Plugmatter’ on your WordPress dashboard. This can be found on the left column.
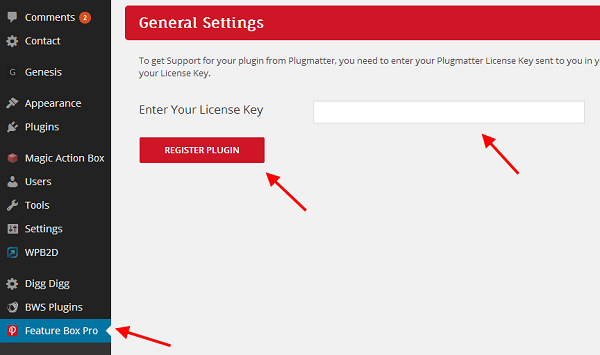
Once you visit the plugin’s settings, enter your licence key in the field provided and click on ‘Register Plugin’ to register your plugin. This licence key can be found in the email sent to you or in your Plugmatter member area.
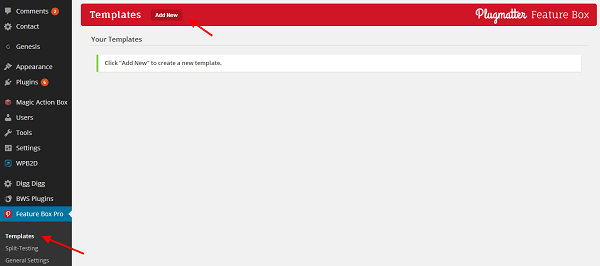
You can now create your first feature box. Visit the template section of the plugin and click on Add New.
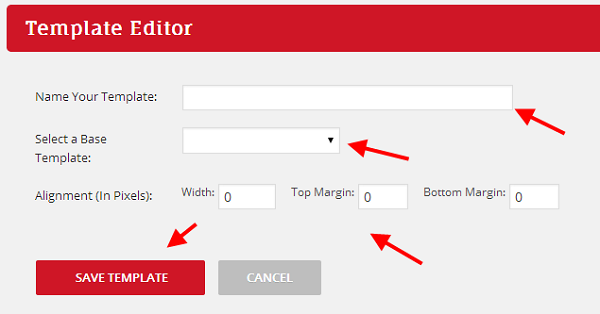
In the template editor, first give your template a name. This helps you differentiate it from the others. Now choose a base custom template. You have a wide variety to choose from. Here are a couple…
This is Portrait
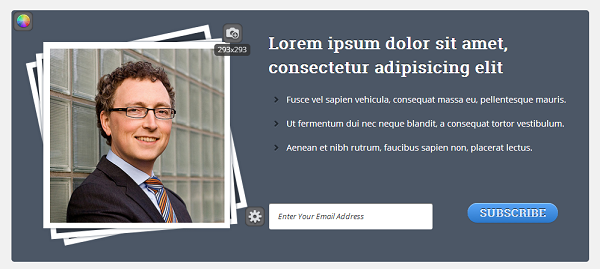
This is Gradient
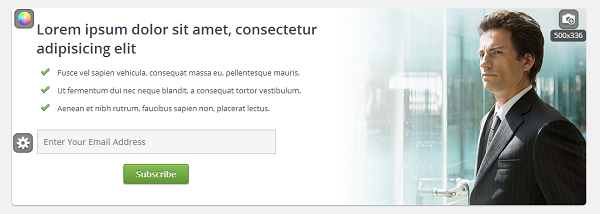
There are 6 to 10 templates to choose from. You have ones with different styles, colours, sizes, image placements, image sizes and there’s also one for video. Choose the one that suits your blog. You could also create a few and split test them to check which one converts best.
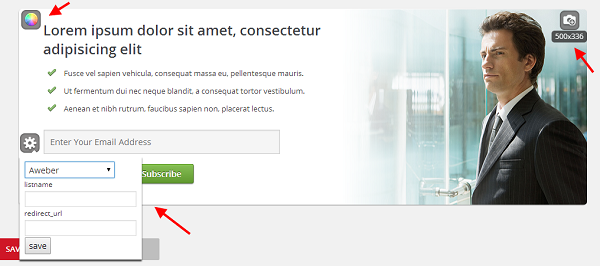
You can modify your template by adding and removing text, changing text colour, background colour and uploading an image.
Also make sure you connect your email list to your form. Details on how to connect different email services can be found in your Plugmatter user guide. The user guide can also show you how to create and install your own custom template.
Once you have made your changes and added the email list of your respective service provider, choose an alignment if necessary and save your template.
Now that you have a template, it is time to show you how to enable it.
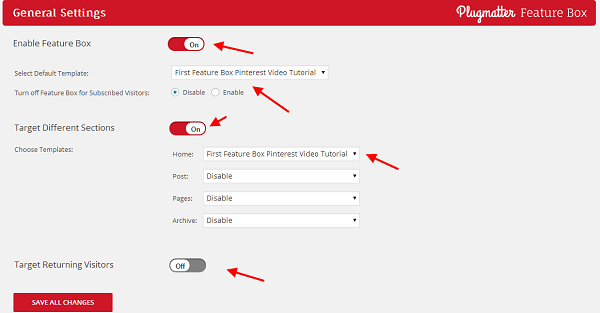
First visit the general settings of your plugin and switch on the feature box by clicking on Enable Feature Box. Now select the template you have created. You can also disable the feature box for subscribed visitors.
Targeting different sections is a great option too, as you can choose if you would like the box to appear only on top of the home page or on top of blog posts, pages and archives as well. You can even make different types of forms appear on different parts of the blog and target returning visitors.
If you want to ensure that you get the most out of the feature box perform a split test. You can experiment with different form styles, colours, copy, fonts, etc. Details on how to perform a split test can be found in the Plugmatter user guide.
What do I Think?
I think it’s a really good plugin as it makes it easy to add a feature box especially for someone like me who doesn’t know how to code. It takes minutes to create. There are easily modifiable templates to choose from and more are to be added soon. Also the people at Plugmatter are very helpful with their prompt replies and are always ready to give a hand. I am also glad with the regular plugin updates which ensure that it runs smoothly.
It cost me around $100 to get a designer to create it for my other blog like I mentioned before and Plugmatter is available for as little as $37 which I think is a bargain. Of course if you want a licence for more websites it costs a little more, but is still less than hiring a designer. And you can take advantage of the extra features mentioned above. You can check it out by visiting this link.
Sign up to have our latest blog posts emailed straight to your inbox and get the Free Ebook How to Get Started With Inbound Marketing.
Over to You:
Have you ever created a feature box to generate more blog subscribers? What other techniques do you use to get more blog subscribers? What do you think about the above plugin? Please leave your comments below.
If you found the post on how to add a feature box to generate more blog subscribers helpful and think your friends and followers will too, please share it with them by using the share buttons below.
